Prime Suite EHI XML Document Reference
Each document provided as part of a Single Patient EHI export / conversion will be stored in a folder that contains two files:
- Document Data File. This XML file has the document’s details from Greenway PrimeSuite database table with column headings and document data in the table row. However, it will not have the document’s raw content. The document data filename format is: ClinicalBin_<patientID>_<documentID>_<seqID>_<filetypeID>_Data.xml
- Document File. This file is the document. Some documents are created in PrimeSuite while others are created externally and stored to PrimeSuite. The document filename format is: ClinicalBin_<patientID>_<documentID>_<seqID>_<filetypeID>_Document.ext. Supported file formats are: PDF, CCDA(XML), TIF, JPG, GIF, BMP, TXT, and XML.
There are two types of documents that may be provided as part of the export / conversion:
- Generic Document Types. Some documents exported / converted to their original format(s) do not generate any specific Greenway proprietary documents that need additional documentation. For a list of these document types, refer to the section Generic Document Types.
- Greenway Proprietary Document Formats. Some documents generated in Prime Suite are in a Greenway proprietary format in XML. To read the XML document types, refer to the detailed documentation in the section XML Document Types.
Generic Document Types
The generic document types are generally created outside of Prime Suite and stored in Prime Suite using the Custom Notes section or the Document Import section. The document generated from document Import Section (New Import or Select from Document List) can be uploaded in one of these formats: PDF, CCDA (XML), TIF, JPG, GIF, BMP, or TXT.
Below is the list of documents that may be in the EHI export / conversion package that do not generate any specific Greenway proprietary formats that need additional documentation.
|
Nursing Assessment |
Notice Of Privacy Practice |
Test TIF |
|
Misc. Correspondence |
General Consent |
Test PDF |
|
Health History Form |
Authorization for Use of Disclosure |
Test JPEG |
|
Pre-Registration Form |
Acknowledgement of Receipt |
Test BMP |
|
Amendment Request |
Advanced Beneficiary Notice |
Test Text |
|
Immunization Reconciliation Form |
Driver's License |
Test word doc |
|
QTPCustomNoteImage |
Financial |
Test Fax |
|
Urinalysis |
Insurance Card |
Test PNG |
|
Audiogram |
Patient Information Forms |
Test GIF |
|
CBC report |
Referral |
|
|
PS Health History Form |
Release of Information |
Test XML |
|
EHRnotify |
Waiver |
Test Imported |
|
Arthroscopy Report |
Cardiac Catheterization Report |
Holters |
|
Autopsy Report |
ECG |
tension |
Greenway XML Document Types
This section contains information about the documents created in Prime Suite that are in a Greenway proprietary format. Documents in a Greenway proprietary format can be identified by looking at the filetypeID in the filename. The file format of documents is: ClinicalBin_<patientID>_<documentID>_<seqID>_<filetypeID>_Document.xml.
For example, if the filename is 'ClinicalBin_26228_5481_1_1005_Document.xml', the filetype ID is 1005. In the list below of file types with a proprietary format, 1005 is listed as a Clinical Note. Review the Clinical Note documentation side-by-side with the patient's clinical note to better understand the XML elements.

Clinical Note Documentation (1005)
Clinical Note Documentation (1016)
Correspondence Note and Consultation Note (1016)
Lab Result Documentation (1000 BinType)
Lab Result Documentation (1016)
Converting Flowsheet XML Data into SVG for Improved Visualization
Prenatal Flowsheet (1005) Documentation
Allergy Tests (1005) Documentation
Allergy Education (1005) Documentation
Clinical Notes Documentation (1005)
As part of the EHI export, all required documents should be exported / converted from Prime Suite and will be available in the document folder. The below-listed notes/documents are collectively termed Clinical Notes, these notes can be created in Prime Suite and are stored in GMT(XML) format in the database.
- Progress Notes
- Procedure Note
- History and Physical
- Triage Note
- Orders Note
- Quick Note
- Custom Notes
The EHI export includes only the most current version of a signed clinical note.
Below is the XML output for a Progress Note with descriptions of the elements. All of the Clinical Note document types start with a Header. In the Body, however, they sections used are different for the various Clinical Note types.
Header [1005 ~ Progress Note, Procedure Note, History and Physical, Triage Note, Orders Note, Quick Note and Custom Notes]:
- <clinical_document_header>: The root element representing the clinical document header.
- <id>: Represents the ID of the document.
- Attributes:
- EX: The ID value (DocumentID_SequenceNumber, External Identifier).
- RT: The ID value (Coding System).
- <set_id>: Specifies the set ID of the document.
- Attributes:
- EX: The set ID value (DocumentID, External Identifier)
- RT: The ID value (Coding System).
- Attributes:
- <version_nbr>: Indicates the version number of the document.
- Attributes:
- V: The version number.
- Attributes:
- <document_type_cd>: Describes the type of the document.
- Attributes:
- gmtid: The GMT ID(DocTypeID).
- V: The value of the document type code (LoincCode).
- S: The ID value (Coding System).
- DN: The display name of the document type (Document TypeName).
- Attributes:
- <organization>: Represents the organization associated with the document.
- Attributes:
- NM: The name of the organization.
- Attributes:
- <origination_dttm>: Specifies the date and time of the document's origination.
- Attributes:
- V: The origination date and time value.
- Attributes:
- <confidentialityCode>: Provides information about the confidentiality code of the
document.
- Attributes:
- code: The code value.
- displayName: The display name of the confidentiality.
- codeSystem: The code system value.
- codeSystemName: The name of the confidentiality code system.
- Attributes:
- <patient_encounter>: Contains information about the patient encounter.
- <encounter_tmr>: Represents the encounter date and time.
- Attributes:
- visit: Indicates whether it is a visit (true/false).
- V: The encounter date and time value.
- visit: Indicates whether it is a visit (true/false).
- Attributes:
- <encounter_tmr>: Represents the encounter date and time.
- <legal_authenticator>: Represents the legal authenticator associated with the
document.
- <signature_cd>: Specifies the signature code.
- Attributes:
- V: The signature code value.
- Attributes:
- <participation_tmr>: Indicates the participation date and time.
-
- Attributes:
- V: The participation date and time value.
- Attributes:
-
- <id>: Represents the ID of the legal authenticator.
- Attributes:
- EX: The ID value.
- RT: The ID value (Coding System).
- Attributes:
- <person>: Contains information about the person associated with the legal
authenticator.
- <person_name>: Represents the name of the person.
- <nm>: Contains the name components.
- <GIV>: Represents the given name.
- Attributes:
- V: The given name value.
- <MID>: Represents the middle name.
- Attributes:
- V: The middle name value.
- <FAM>: Represents the family name.
- Attributes:
- V: The family name value.
- <SFX>: Represents the name suffix.
- Attributes:
- V: The suffix value.
- <person_name.type_cd>: Specifies the type of the person’s
name.
- Attributes:
- V: The type of code value.
- S: The ID value(Coding System).
- <nm>: Contains the name components.
- <person_name>: Represents the name of the person.
- <signature_cd>: Specifies the signature code.
- <patient>: Contains details about the patient.
- <patient.type_cd>: Specifies the patient type code.
- Attributes:
- V: The patient type code value.
- Attributes:
- <person>: Represents the person information of the patient.
- <id>: Represents the ID of the person.
- Attributes:
- EX: The ID value.
- RT: The ID value(Coding System).
- <id>: Represents the ID of the person.
- <patient.type_cd>: Specifies the patient type code.
- <person>:
- <person_name>:
- <nm>:
- <GIV>:
- Attributes:
- V: The given name value.
- <FAM>:
- Attributes:
- V: The family name value.
- <SFX>:
- Attributes:
- V: The suffix value.
- <person_name.type_cd>:
- Attributes:
- V: The type of code value.
- S: The ID Value(Coding System).
- Attributes:
- <addr>: Represents the address information of the patient.
- <STR>: Represents the street address.
- Attributes:
- V: The street address value.
- <CTY>: Represents the city.
- Attributes:
- V: The city value.
- <STA>: Represents the state.
- Attributes:
- V: The state value.
- <ZIP>: Represents the ZIP code.
- Attributes:
- V: The ZIP code value.
- <telecom>: Represents the contact information of the patient.
- Attributes:
- V: The contact value.
- USE: The usage of the contact.
- <birth_dttm>: Specifies the birth date and time of the patient.
- Attributes:
- V: The birth date and time value.
- <pcp_name>: Represents the name of the primary care provider associated with the
patient.
- Attributes:
- V: The name value.
- <referring_name>: Represents the name of the referring provider associated with
the patient.
- Attributes:
- V: The name value.
- <administrative_gender_cd>: Indicates the administrative gender code of the
patient.
- Attributes:
- V: The gender value.
- S: The ID value(Coding System).
Each clinical note is structured into various sections, as outlined below.
1.Progress Note
- CC (Chief Complaint) Go to it
- HPI (History of Present Illness) Go to it
- PFSH (Past Medical, Family and Social History) Go to it
- ROS (Review of Systems) Go to it
- Vitals Go to it
- PE (Physical Exam) Go to it
- Drawings Go to it
- Results Go to it
- Assessment Go to it
- Plan Go to it
- E&M (Evaluation and Management) Go to it
2.Procedure Note
3.History and Physical
- CC (Chief Complaint) Go to it
- HPI (History of Present Illness) Go to it
- PFSH (Past Medical, Family and Social History) Go to it
- ROS (Review of Systems) Go to it
- Vitals Go to it
- PE (Physical Exam) Go to it
- Drawings Go to it
- Results Go to it
- Assessments Go to it
- Plan Go to it
- E&M (Evaluation and Management)
4.Triage Note
- CC (Chief Complaint) Go to it
- PFSH (Past Medical, Family and Social History) Go to it
- ROS (Review of Systems) Go to it
- Vitals Go to it
5.Orders Note
6.Quick Note
- HPI (History of Present Illness) Go to it
- Vitals Go to it
- PE (Physical Exam) Go to it
- Drawings Go to it
- Assessment Go to it
- Plan Go to it
- E&M (Evaluation and Management)
Body [1005]:
A sample Progress note has all of the possible sections covered in the clinical note by large. Let’s consider the Progress note and see how each section of the Progress note is structured.
<Section1>: Chief Complaint
This XML represents a section titled "Chief Complaint" with local markup elements. The local markup element may be empty or can contain sketchpads.
- <section> element
- The <caption> element represents the caption or title of the section, which is " Chief Complaint ".
- The <list> element represents the collection of complaints.
- <item> Represent a single complaint.
- There could be 1 or more <item> elements within the <list>.
- <content> Content of the complaint.
- There could be 1 or more <local_markup> elements within the section.
- Within the <local_markup> element, there is an XML structure represented as a
string. The XML structure includes:
- <sketchpads>: Represents a collection of sketchpads.
- <sketchpad>: Represents a single sketchpad.
- Attributes:
- section: Specifies the section name of the sketchpad (e.g., " Chief Complaint ").
- index: Specifies the index of the sketchpad.
- srcID: Specifies the source ID of the sketchpad.
- expandcount: Specifies the expand count of the sketchpad.
- expanddistance: Specifies the expand distance of the sketchpad.
- canvasheight: Specifies the canvas height of the sketchpad.
- <text>: Represents text data associated with the sketchpad.
- Attributes:
- data: Contains the text data.
- <canvas>: Represents a canvas element.
- <sketchpads>: Represents a collection of sketchpads.
- Within the <local_markup> element, there is an XML structure represented as a
string. The XML structure includes:
<Section2>: History of Present Illness
This XML represents a section titled "History of Present Illness" with local markup elements. The local markup element may be empty or can contain a sketchpad.
- <section> element
- The <caption> element represents the caption or title of the section, which is " History of Present Illness ".
- The <paragraph> element represents the Clinical Note Template data.
- There could be 1 or more <paragraph> elements within the section.
- <content> Represents a content or Text which is added in the Clinical Note Template.
- There could be 1 or more <content> elements within the <paragraph>.
- There could be 1 or more <paragraph> elements within the section.
- There could be 1 or more <local_markup> elements within the section.
- Within the <local_markup> element, there is an XML structure
represented as a string. The XML structure includes:
- <sketchpads>: Represents a collection of sketchpads.
- <sketchpad>: Represents a single sketchpad.
- Attributes:
- section: Specifies the section name of the sketchpad (e.g., " History of Present Illness ").
- index: Specifies the index of the sketchpad.
- srcID: Specifies the source ID of the sketchpad.
- expandcount: Specifies the expand count of the sketchpad.
- expanddistance: Specifies the expand distance of the sketchpad.
- canvasheight: Specifies the canvas height of the sketchpad.
- <text>: Represents text data associated with the sketchpad.
- Attributes:
- data: Contains the text data.
- <canvas>: Represents a canvas element.
- Within the <local_markup> element, there is an XML structure
represented as a string. The XML structure includes:
<Section3>: Past Medical, Family and Social History (PFSH)
This XML represents a section titled "PFSH" with local markup elements. The local markup element may be empty or can contain sketchpads.
- <section> element
- This section contains many sub-sections.
- The <caption> element represents the caption or title of the section, which is " Past Medical History".
- <Table> It holds the patient's historical medical information. Displays in a
tabular data using rows and columns.
- Attributes:
- Disease Name
- Date Onset
- Notes
- The <caption> element represents the caption or title of the section, which is " Past Surgical History ".
- <Table> It holds a comprehensive record of all the surgical procedures or operations that
a patient has undergone in the past. Displays in a tabular data using rows and columns.
- Attributes:
- Procedure Name
- Date
- Notes
- The <caption> element represents the caption or title of the section, which is " Medication List ".
- <Table> It holds all the medications that a patient is currently taking or has taken in
the past. Displays in a tabular data using rows and columns.
- Attributes:
- Medication Name
- Date Started
- Instructions
- The <caption> element represents the caption or title of the section, which is " Allergy List".
- <Table> It holds a comprehensive record of any allergies or adverse
reactions that a patient has to specific substances, medications, foods, or environmental
triggers. Displays in a tabular data using rows and columns. 
- Attributes:
- Allergen Name
- Date
- Reactions
- Notes
- The <caption> element represents the caption or title of the section, which is "Family Medical History".
- <Table> It holds detailed records of the health conditions and medical
history of a patient's close blood relatives, such as parents, siblings, grandparents, and
sometimes extended family members. Displays in a tabular data using rows and columns.
- Attributes:
- Disease Name
- Relative/Age
- Notes
- The <caption> element represents the caption or title of the section, which is " Genetic Screening".
- <Table> It holds a range of important information and implications
related to an individual’s genetic Screening. Displays in a tabular data using rows and columns.
- Attributes:
- Disease Name
- Relationship to Child
- Notes
- The <caption> element represents the caption or title of the section, which is " Social History".
- <Table> It holds a comprehensive record of an individual's social,
environmental, and lifestyle factors that may have an impact on their health and well-being.
Displays in a tabular data using rows and columns.
- Attributes:
- Finding
- Status
- Start/Stop
- Quantity
- Notes
- The <caption> element represents the caption or title of the section, which is " Immunizations".
- <Table> It holds a variety of important elements and information aimed at
preventing infectious diseases and promoting public health. Displays in a tabular data using
rows and columns. 
- Attributes:
- Name (vaccine name)
- Date Admin
- Mfg. (Manufacturer)
- Trade Name
- Lot Number
- Route
- Injection
- VIS Given (Vaccine Information Statement)
- VIS Publication (Vaccine Information Statement)
- The <caption> element represents the caption or title of the section, which is "Additional Info (PFSH)".
- There is a <local_markup> element within the section.
- Within the <local_markup> element, there is an XML structure represented as a string. The XML structure includes:
- <sketchpads>: Represents a collection of sketchpads.
- <sketchpad>: Represents a single sketchpad.
- Attributes:
- section: Specifies the section name of the sketchpad (e.g., "pfsh").
- index: Specifies the index of the sketchpad.
- srcID: Specifies the source ID of the sketchpad.
- expandcount: Specifies the expand count of the sketchpad.
- expanddistance: Specifies the expanded distance of the sketchpad.
- canvasheight: Specifies the canvas height of the sketchpad.
- <text>: Represents text data associated with the sketchpad.
- Attributes:
- data: Contains the text data.
- <canvas>: Represents a canvas element.
- <section> element:
- The <caption_cd> element represents the comprehensive details about the
system in this section of the document.
- Attributes:
- V: The ID value of LOINC (LOINC Code)
- S: The ID value (Coding System).
- The <caption_cd> element represents the comprehensive details about the
system in this section of the document.
- The <caption> element represents the caption or title of the section, which is "Review of Systems".
- <section> For every section there could be 1 or more
<local_markup> elements.
- <caption>Element represents the name of the system.
- <caption_cd> Comprehensive details about the system in this section of
the document.
- Attribute:
- V: The ID value of LOINC (LOINC Code)
- <list>Element can contain list of items.
- <item> represents an item Element.
- <caption>: Element represents the patient admits or denies.
- <content>: Element represents the Symptom in a patient.
- <item> represents an item Element.
- <local_markup> element
- Within the <local_markup> element, there is an XML structure represented as a string. The XML structure includes:
- <sketchpads>: Represents a collection of sketchpads.
- <sketchpad>: Represents a single sketchpad.
- Attributes:
- section: Specifies the section name of the sketchpad (e.g., " Review of Systems ").
- index: Specifies the index of the sketchpad.
- srcID: Specifies the source ID of the sketchpad.
- expandcount: Specifies the expand count of the sketchpad.
- expanddistance: Specifies the expanded distance of the sketchpad.
- canvasheight: Specifies the canvas height of the sketchpad.
- <text>: Represents text data associated with the sketchpad.
- Attributes:
- data: Contains the text data.
- <canvas>: Represents a canvas element.
- <section> element:
- The <caption> element represents the caption or title of the section, which is "Vitals".
- There could be 1 or more <local_markup> elements within the section.
- Within the <local_markup> element, there is an XML structure represented as a string. The XML structure includes:
- <sketchpads>: Represents a collection of sketchpads.
- <sketchpad>: Represents a single sketchpad.
- Attributes:
- section: Specifies the section name of the sketchpad (e.g., "vitals").
- index: Specifies the index of the sketchpad.
- srcID: Specifies the source ID of the sketchpad.
- expandcount: Specifies the expand count of the sketchpad.
- expanddistance: Specifies the expanded distance of the sketchpad.
- canvasheight: Specifies the canvas height of the sketchpad.
- <text>: Represents text data associated with the sketchpad.
- Attributes:
- data: Contains the text data.
- <canvas>: Represents a canvas element.
- <section> element:
- The <caption> element represents the caption or title of the section, which is "
Physical Examination ".
- Attributes:
- V: The value of the document type code (LOINC Code).
- S: The ID value (Coding System).
- There could be 1 or more <section> elements within this section. Constitutional, Eyes, etc., .
- <section> element for Constitutional
- <caption>
- <caption_cd> Comprehensive details.
- Attributes:
- V: The ID value of LOINC (LOINC Code)
- <list>Element can contain list of items.
- <item> represents an item Element.
- <caption>: Element represents the Physical examination findings.
- <content>: Element represents the Physical examination details of the patient.
- <item> represents an item Element.
- There could be 1 or more <local_markup> elements within the section.
- Within the <local_markup> element, there is an XML structure represented as a
string. The XML structure includes:
- <sketchpads>: Represents a collection of sketchpads.
- <sketchpad>: Represents a single sketchpad.
- Attributes:
- section: Specifies the section name of the sketchpad (e.g., " Physical Examination ").
- index: Specifies the index of the sketchpad.
- srcID: Specifies the source ID of the sketchpad.
- expandcount: Specifies the expand count of the sketchpad.
- expanddistance: Specifies the expanded distance of the sketchpad.
- canvasheight: Specifies the canvas height of the sketchpad.
- <text>: Represents text data associated with the sketchpad.
- Attributes:
- data: Contains the text data.
- <canvas>: Represents a canvas element.
- <section> element
- There is one <local_markup> element within the section.
- Within the <local_markup> element, there is an XML structure represented as a string. The XML structure includes:
- <drawings> element contains the total number of drawings. Adam Images,
Image Library, local system drawings, etc.,
- Attribute:
- Lastrefid: represents the total number of drawings.
- <drawing> Adam Images
- Attribute:
- refid: reference id
- <sketchpads>: Represents a collection of sketchpads.
- Attribute:
- refid: reference id
- createdate: Specifies the creation date.
- title: Specifies the title of the image.
- type: Specifies the type of the image.
- filename: Specifies the filename of the image.
- version: Specifies the version number.
- imageid: Specifies the ID of the image.
- <sketchpad>: Represents a single sketchpad.
- Attributes:
- seq: Specifies the sequence number of the image.
- canvasheight: Specifies the canvas height of the sketchpad.
- expandcount: Specifies the expand count of the sketchpad.
- <text>: Represents text data associated with the sketchpad.
- Attributes:
- data: Contains the text data.
- <canvas>: Represents a canvas element.
- <drawing> Image Library
- Attribute:
- refid: reference id
- <sketchpads>: Represents a collection of sketchpads.
- Attribute:
- refid: reference id
- groupid: Specifies the image groupid.
- doctypeid: Specifies the DocumentTypeID.
- title: Specifies the title of the image.
- location: Specifies the location of the image.
- version: Specifies the version number.
- createdate: Specifies the creation date of the image.
- <sketchpad>: Represents a single sketchpad.
- Attributes:
- seq: Specifies the sequence number of the image.
- canvasheight: Specifies the canvas height of the sketchpad.
- expandcount: Specifies the expand count of the sketchpad.
- <text>: Represents text data associated with the sketchpad.
- Attributes:
- data: Contains the text data.
- <canvas>: Represents a canvas element.
- <drawing> local filesystem
- Attribute:
- refid: reference id
- <sketchpads>: Represents a collection of sketchpads.
- Attributes:
- refid: reference id
- title: Specifies the title of the image.
- location: Specifies the location of the image.
- version: Specifies the version number.
- createdate: Specifies the creation date of the image.
- <Imglibgroup>element
- Attributes:
- Location: Specifies the location of the image.
- groupname: Specifies the title(groupname) of the image.
- <Imglibgroupitem>
- Attributes:
- Seq: Specifies the sequence number of the image.
- Image: contains the Image base64.
- <sketchpad>: Represents a single sketchpad.
- Attributes:
- seq: Specifies the sequence number of the image.
- canvasheight: Specifies the canvas height of the sketchpad.
- expandcount: Specifies the expand count of the sketchpad.
- <text>: Represents text data associated with the sketchpad.
- Attributes:
- data: Contains the text data.
- <canvas>: Represents a canvas element.
<section>: Past Medical History
<section>: Past Surgical History
<section>: Medication List
<section>: Allergy List
<section>: Family Medical History
<section>: Genetic Screening
<section>: Social History
<section>: Immunizations
<section> element:
<Section4>: Review of Systems
This XML represents a section titled "Review of Systems" with comprehensive details about the system and local markup elements. The local markup element may be empty or can contain a sketchpad.
<Section5>: Vitals
This XML represents a section titled "Vitals" with two local markup elements. The local markup element may be empty or can contain a sketchpad.
<Section6>: Physical Examination
This XML represents a section titled "Physical Examination" with local markup elements. The local markup element may be empty or can contain a sketchpad.
<Section7>: Drawings
This XML represents a section titled "Drawings" with local markup element. The local markup element may be empty or can contain sketchpads.
Reconstruct Medical Drawings with Patient-Specific Annotations as SVG
Introduction
SVG (Scalable Vector Graphics) is a web-friendly vector file format that stores images via mathematical formulas based on points and lines on a grid. You can reconstruct medical drawings with patient-specific annotations by creating an SVG file and using the existing tags/values from the base output XML in the SVG file.
Below values are fixed:
x="11" y="45", width = 700
Get height from the
Steps to Construct the SVG
Follow these steps to reconstruct medical drawings with patient-specific annotations:
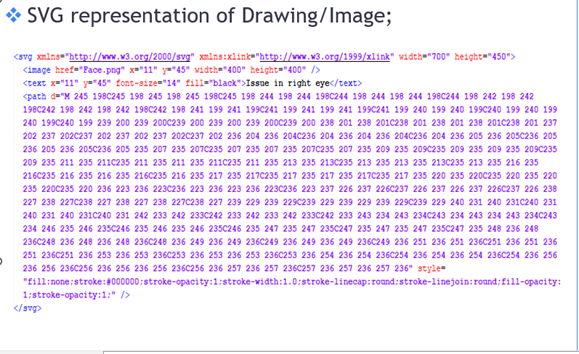
1. Start the SVG Document:
Begin by adding the opening <svg> tag. Set the required attributes like xmlns for the XML namespace, xmlns:xlink for the xlink namespace, width, and height to define the canvas size. Specify attributes like width, height.
Ex: <svg xmlns="http://www.w3.org/2000/svg" xmlns:xlink="http://www.w3.org/1999/xlink" width="700" height="450">
2. Add an Image:
Use the <image> element to include an image in the SVG. Specify the href attribute with the path to the image file, and set the x, y, width, and height attributes to position and size the image.
Ex: <image href="Face.png" x="11" y="45" width="400" height="400" />
3. Add Text:
Incorporate text using the <text> element. Specify the x and y attributes for positioning and set other attributes like font-size and fill for styling.
Ex: <text x="11" y="45" font-size="14" fill="black">Issue in right eye</text>
4. Add a Path:
The path data represents a series of connected points and control points. Include the <path> element and set the d attribute to the provided path data.
Ex: <path d="M 245 198C245 198 245 198 245 198C245 198 244 198 244 198C244 198 244 198 244 198C244 198 242 198 242 198C242 198 242 198 242 198C242 198 241 199 241 199C241 199 241 199 241 199C241 199 240 199 240 199C240 199 240 199 240 199C240 199 239 200 239 200C239 200 239 200 239 200C239 200 238 201 238 201C238 201 238 201 238 201C238 201 237 202 237 202C237 202 237 202 237 202C237 202 236 204 236 204C236 204 236 204 236 204C236 204 236 205 236 205C236 205 236 205 236 205C236 205 235 207 235 207C235 207 235 207 235 207C235 207 235 209 235 209C235 209 235 209 235 209C235 209 235 211 235 211C235 211 235 211 235 211C235 211 235 213 235 213C235 213 235 213 235 213C235 213 235 216 235 216C235 216 235 216 235 216C235 216 235 217 235 217C235 217 235 217 235 217C235 217 235 220 235 220C235 220 235 220 235 220C235 220 236 223 236 223C236 223 236 223 236 223C236 223 237 226 237 226C237 226 237 226 237 226C237 226 238 227 238 227C238 227 238 227 238 227C238 227 239 229 239 229C239 229 239 229 239 229C239 229 240 231 240 231C240 231 240 231 240 231C240 231 242 233 242 233C242 233 242 233 242 233C242 233 243 234 243 234C243 234 243 234 243 234C243 234 246 235 246 235C246 235 246 235 246 235C246 235 247 235 247 235C247 235 247 235 247 235C247 235 248 236 248 236C248 236 248 236 248 236C248 236 249 236 249 236C249 236 249 236 249 236C249 236 251 236 251 236C251 236 251 236 251 236C251 236 253 236 253 236C253 236 253 236 253 236C253 236 254 236 254 236C254 236 254 236 254 236C254 236 256 236 256 236C256 236 256 236 256 236C256 236 257 236 257 236C257 236 257 236 257 236" style="fill:none;stroke:#000000;stroke-opacity:1;stroke-width:1.0;stroke-linecap:round;stroke-linejoin:round;fill-opacity:1;stroke-opacity:1;" />
5. Close SVG Document
Finish the SVG document by adding the closing </svg> tag:
Ex: </svg>
6. Save the File:
Save the file with an .svg extension, such as "example.svg".
7. View in Browser:
Open the SVG file in a browser to see the visual representation of your SVG code.
The image below is an example of an svg file opened in browser. You can see the medical drawing and a patient-specific marking, as it was in the Prime Suite clinical note.
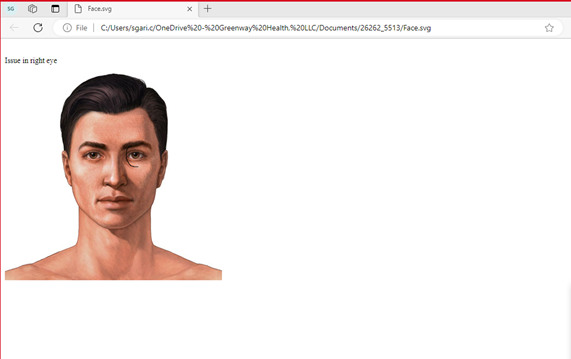
Below is the SVG code for the above image
<Section8>: Results
This XML represents a section titled "Results" with local markup elements. The local markup element may be empty or can contain a sketchpad.
- <section> element
- The <caption> element represents the caption or title of the section, which is " Results ".
- There could be 1 or more <section> elements within this section. In-Office Procedures, Historical Results, etc., .
- <section> element for In-Office Procedures: Contains one or more <sections>
element for different Categories.
- The <caption> element represents the caption or title of the section, which is " In-Office Procedures ".
- <section> element represent the Category of the concept. This section
also contains one or more <list> element for different orders.
- The <caption> element represents the Category of the concept, which is "Custom, lab results, etc.,".
- <section> element contains the Results associated Orders and OrderSet.
- <caption>element represents the Order Description with procedure code.
- <coded_entry> element contains the procedure code.
- Attributes :
- V : Procedure code value.
- There could be 1 or more <local_markup> elements within the section.
- Within the <local_markup> element, there is an XML structure represented as a string. The XML structure includes:
- <sketchpads>: Represents a collection of sketchpads.
- <sketchpad>: Represents a single sketchpad.
- Attributes:
- section: Specifies the section name of the sketchpad (e.g., " Results ").
- index: Specifies the index of the sketchpad.
- srcID: Specifies the source ID of the sketchpad.
- expandcount: Specifies the expand count of the sketchpad.
- expanddistance: Specifies the expand distance of the sketchpad.
- canvasheight: Specifies the canvas height of the sketchpad.
- <text>: Represents text data associated with the sketchpad.
- Attributes:
- data: Contains the text data.
- <canvas>: Represents a canvas element.
<Section9>: Assessment
This XML represents a section titled "Assessment" with local markup elements. The local markup element may be empty or can contain a sketchpad.
- <section> element for Assessment:
- The <caption> element represents the caption or title of the section, which is "Assessment".
- <list> element contains one or more <item> element for different diagnosis.
- <item>: Represents the separate line item added for diagnosis.
- <content> : Data for diagnosis code & description added under this.
- <dxdesc>: Diagnosis description.
- <dxcode>: Diagnosis code (Combination of ICD9 & ICD10. Ex : ICD9/ICD10).
- <coded_entry>: Contains the diagnosis code value.
- Attributes :
- V : Diagnosis code value.
- <content> : Contains the text data for the diagnosis.
- There could be 1 or more <local_markup> elements within the section.
- Within the <local_markup> element, there is an XML structure represented as a string. The XML structure includes:
- <sketchpads>: Represents a collection of sketchpads.
- <sketchpad>: Represents a single sketchpad.
- Attributes:
- section: Specifies the section name of the sketchpad (e.g., " Assessment ").
- index: Specifies the index of the sketchpad.
- srcID: Specifies the source ID of the sketchpad.
- expandcount: Specifies the expand count of the sketchpad.
- expanddistance: Specifies the expanded distance of the sketchpad.
- canvasheight: Specifies the canvas height of the sketchpad.
- <text>: Represents text data associated with the sketchpad.
- Attributes:
- data: Contains the text data.
- <canvas>: Represents a canvas element.
- <item>: Represents the separate line item added for diagnosis.
<Section10>: Plan
This XML represents a section titled "Plan" with different sub sections with local markup elements. The sub-sections and local markup element may be empty or can contain data and sketchpad.
- <section> element for Plan:
- The <caption> element represents the caption or title of the section, which is
"Plan".
- Attributes :
- V : Document code.
- S : Document coding system.
- There could be 1 or more <section> elements within this section. Orders, Medications, Instructions, Disposition, Associate Tasks, Correspondence, Consultation & Referrals.
- <section> element for Orders:
- The <caption> element represents the caption or title of the section, which is "Orders".
- <list> element contains one or more <item> element for different procedures.
- <item> : Represents the separate line item added for procedures.
- <content> : Data for procedure name, procedure code, added date & information about holding lab result until reviewed (Yes/No).
- <coded_entry>: Contains the procedure code value.
- Attributes :
- V : Procedure code value.
- <notes>: Contains the note added by user.
- <section> element for Medications:
- The <caption> element represents the caption or title of the section, which is "Medications".
- <list> element contains one or more <item> element for different
medications.
- <item> : Represents the separate line item added for medication.
- <content> : Data for drug name along with its strength.
- SIG : Instructions for the dosage of drug.
- DISP : Quantity along with refill number.
- <table> : Added for additional information.
- <tr> : 1 or more element added for additional info.
- <td> : Contains the date when drug was prescribed.
- <section> element for Instructions:
- The <caption> element represents the caption or title of the section, which is "Instructions".
- <list> element contains one or more <item> element for different
instructions.
- <item> : Represents the separate line item added for instruction.
- <content> : Data for instruction added for patient in context with medication.
- <section> element for Disposition:
- The <caption> element represents the caption or title of the section, which is " Disposition ".
- <list> element contains one or more <item> element for different
Disposition.
- <item> : Represents the separate line item added for Disposition.
- <content> : Data for disposition added for patient in context with Care Transition, Return Visit Request etc..,.
- <section> element for Associate Tasks:
- The <caption> element represents the caption or title of the section, which is "Associate Tasks".
- <list> element contains one or more <item> element for different
Tasks.
- <item> : Represents the separate line item added for task.
- <content> : Data for task ID & task type along with comments added by user.
- <section> element for Correspondence:
- The <caption> element represents the caption or title of the section, which is " Correspondence ".
- <list> element contains one or more <item> element for different
Recipient’s.
- <item> : Represents the separate line item added for each care provider(Recipient’s).
- <content> : Contains the Recipient’s name (Care provider) to whom can send this document.
- <section> element for Consultation:
- The <caption> element represents the caption or title of the section, which is " Consultation ".
- <list> element contains one or more <item> element for different
Recipient’s.
- <item>: Represents the separate line item added for each care provider (Recipient’s).
- <content>: Contains the Recipient’s name (Care provider) to whom can send this document.
- <section> element for Referrals:
- The <caption> element represents the caption or title of the section, which is "Referrals".
- <list> element contains one or more <item> element for referrals.
- <item> : Represents the separate line item added for task.
- <content> : one or more element containing the data for referral ID, added date, type (Inbound/outbound), Specialty information, reason (comments) and other information as well in context with referral.
- There could be 1 or more <local_markup> elements within the section.
- Within the <local_markup> element, there is an XML structure
represented as a string. The XML structure includes:
- <sketchpads>: Represents a collection of sketchpads.
- <sketchpad>: Represents a single sketchpad.
- Attributes:
- section: Specifies the section name of the sketchpad (e.g., "Plan").
- index: Specifies the index of the sketchpad.
- srcID: Specifies the source ID of the sketchpad.
- expandcount: Specifies the expand count of the sketchpad.
- expanddistance: Specifies the expanded distance of the sketchpad.
- canvasheight: Specifies the canvas height of the sketchpad.
- <text>: Represents text data associated with the sketchpad.
- Attributes:
- data: Contains the text data.
- <canvas>: Represents a canvas element.
Custom Note
The '<sketchpad>' elements are used to represent sketches or drawings within different sections of the clinical document. Each <sketchpad> element has various attributes and child elements that define its properties and content.
|
Sketchpad Attributes |
Description |
|
Section |
Specifies the section of the document where the sketchpad belongs (e.g., "cc" for Chief Complaint, "hpi" for History of Present Illness) |
|
Index |
Indicates the index or order of the sketchpad within the section. |
|
srcID |
Contains metadata and information about the individual patient's clinical documents into a electronic patient record. |
|
expandcount |
Specifies the number of times the sketchpad has been expanded. |
|
expanddistance |
Defines the distance by which the sketchpad expands. |
|
canvasheight |
Indicates the height of the sketchpad's canvas. |
|
Imagelibgroup/imagelibgroupitem |
This attribute would be injected into the original XML output if the original XML is seen to have any image (the embedded image content would be in the form of base64) |
|
Child Elements: |
|
|
<text> |
Represents text content associated with the sketchpad. It can contain a data attribute that holds the actual text. |
|
<canvas> |
Represents the drawing canvas within the sketchpad. It can contain. <json> and <path> elements to define the drawing content. |
|
<json> |
Represents the JSON data associated with the canvas. It can hold drawing-related information. |
|
<path> |
Represents a specific path or stroke within the canvas. It contains attributes and styles that define the appearance of the stroke. |

Clinical Notes Documentation (1016)
Documentation for the 1016 BIN Type (Free Text) for Clinical Notes:
The listed notes/documents below are termed as Clinical Notes. These notes can be created in PrimeSuite and will be stored in GMT(XML) format in the database.
- Progress Notes
- Procedure Note
- History and Physical
- Triage Note
- Orders Note
- Quick Note
- Custom Notes(Discharge Summary Note)
All these documents will share one output (GMT, which is an XML file) format, so this document can be referred to any of the above documents.
These documents will have 3 files with BIN Types 1004, 1005 and 1016. Out of which 1004 is an unsigned document which is not eligible for EHI Export. Other than this BIN Type (1004), the documents below were also excluded from the export.
- Older Version of the documents are excluded. Only the latest version signed by provider is considered as EHI.
- Only Enabled Documents are considered as EHI. Deleted documents are excluded.
Root [1016 ~Progress Note]
- <ClinicalNoteItem>: The root element of Free Text Document. This document does not have any header section.
- <footnote>: Contains the body section.
This document has many “content” sections. See the below image for all the possible sections/contents in Free Text document.

- <content styleCode="Bold">
- <content styleCode="Underline">Progress Note</content>
- </content>: This content has the name of the document, in this case “Progress Note.”
- <content styleCode="Bold">Chief Complaint</content>
- <br/>CC for Chief Complaint testing in Sketch pad<br/>:
- This content has the notes/details added to the chief complaint section of a patient visit.
- <content styleCode="Bold">History of Present Illness</content>
- <br/>History of Present Illness sketch pad for testing<br/>:
- This content has the details of the chief complaint of the patient visit.
- <content styleCode="Bold">Past Medical History</content>: This content has
the list of the Past Medical History of the patient with details below.
- Attributes:
- Disease Name
- This attribute has the details of Disease Name of the patient.
- Date Onset
- This attribute has the of Date of the Disease Name.
- Notes
- This attribute has the Notes of Disease Name.
- <content styleCode="Bold">Past Surgical History</content>: This content has
the details of the Past Surgical History of the patient with details below.
- Attributes:
- Procedure Name
- This attribute has the details of the disease Name of the patient.
- Date
- This attribute has the of Date of the procedure Name.
- Notes
- This attribute has the Notes of Procedure Name.
- <content styleCode="Bold">Medication List</content>
- This content has the details of the Medication List of the patient with details below.
- Attributes:
- Name
- This attribute has the Name of the Medication.
- Date Started
- This attribute has the of Details when It is started.
- Instructions
- This attribute has the Instructions of the medication.
- <content styleCode="Bold"> Allergy List</content>
- This content has the details of the Allergy List of the patient with details below.
- Attributes:
- Allergy Name
- This attribute has the Name of the Allergy.
- Date
- This attribute has the of date of allergy.
- Reactions
- This attribute has the details of the reaction.
- Notes
- This attribute has Notes of Allergy Name.
- <content styleCode="Bold"> Family Medical History </content>
- This content has the details of the Family Medical History of the patient with details below.
- Attributes:
- Disease Name
- This attribute has the Name of the Disease
- Relative/Age
- This attribute has the of relative/age.
- Notes
- This attribute has the details of the Disease Name.
- <content styleCode="Bold"> Genetic Screening</content>
- This content has the details of the Family Medical History of the patient with details below.
- Attributes:
- Disease Name
- This attribute has the Name of the Disease
- Relationship to Child
- This attribute has the of Relationships to Child
- Notes
- This attribute has the details of the Disease Name
- <content styleCode="Bold"> Social History </content>
- This content has the details of the Family Medical History of the patient with details below.
- Attributes:
- Finding
- This attribute has details of the social history.
- Status
- This attribute has the of status of the social history.
- Start/Stop
- This attribute has start/stop details for social History.
- Quantity
- This attribute has Quantity of social History.
- Notes
- This attribute has the details of the Social History
- <content styleCode="Bold"> Immunizations </content>
- This content has the details of the immunizations of the patient with details below.
- Attributes:
- <content styleCode="Bold">Name</content>
- <content styleCode="Bold">Date Admin</content>
- These Two attributes have the details of Name and Date of Immunizations
- Manufacturing (Mfg.)
- This attribute has the Manufacture date of Immunizations.
- Trade Name
- This attribute has Trade Name for Immunizations
- Lot Number
- This attribute has Lot number of Immunizations.
- Route
- This attribute has the details of Route.
- Injection(inj)
- This attribute has details of Injection.
- VIS Given(Vaccine Information Statement)
- This attribute has the details of VIS Given
- VIS Publication(Vaccine Information Statement)
- This attribute has details of VIS Publication
<content styleCode="Bold">Review of Systems</content>
This content "Review of Systems" indicates the section of the medical assessment that is being documented and has many sections and subheadings. See the below image for all the possible contents/lists.

- Constitutional:
"Constitutional" section is likely a part of a comprehensive medical assessment where the healthcare provider is evaluating the patient's general health status.

Each symptom listed is preceded by "Denies," indicating that the patient does not have these symptoms.
- Eyes:
"Eyes" section is likely a part of a comprehensive medical assessment for Patient Eye Health

Each symptom listed is preceded by "Denies," indicating that the patient does not have these symptoms.
- Hent:
"HENT" stands for "Head, Eyes, Nose, Throat." It is a medical acronym often used to categorize and organize the examination or review of a patient's symptoms and conditions related to these specific areas.

Each symptom listed is preceded by "Admits," indicating that the patient does have these symptoms
Each symptom listed is preceded by "Denies," indicating that the patient does not have these symptoms.
- Breasts:
A breast examination is a medical procedure conducted to assess the health and condition of a person's breasts.

Each symptom listed is preceded by "Admits," indicating that the patient does have these symptoms.
Each symptom listed is preceded by "Denies," indicating that the patient does not have these symptoms.
- Cardiovascular:
A cardiovascular examination is a medical assessment conducted to evaluate the health and function of the cardiovascular system, which includes the heart and blood vessels.

Each symptom listed is preceded by "Admits," indicating that the patient does have these symptoms.
Each symptom listed is preceded by "Denies," indicating that the patient does not have these symptoms.
- Respiratory:
A respiratory assessment is a medical examination performed to evaluate the health and function of the respiratory system, which includes the lungs and airways.

Each symptom listed is preceded by "Admits," indicating that the patient does have these symptoms.
Each symptom listed is preceded by "Denies," indicating that the patient does not have these symptoms.
- Gastrointestinal:
A gastrointestinal (GI) assessment is a medical evaluation conducted to assess the health and function of the gastrointestinal system, which includes the organs involved in digestion and processing of food.

Each symptom listed is preceded by "Admits," indicating that the patient does have these symptoms.
Each symptom listed is preceded by "Denies," indicating that the patient does not have these symptoms.
- Genitourinary:
A genitourinary assessment is a medical evaluation performed to assess the health and function of the genitourinary system, which encompasses both the reproductive and urinary systems.

Each symptom listed is preceded by "Admits," indicating that the patient does have these symptoms.
Each symptom listed is preceded by "Denies," indicating that the patient does not have these symptoms.
- Integument:
An integument assessment is a medical evaluation conducted to assess the health and condition of the integumentary system, which includes the skin, hair, and nails.

Each symptom listed is preceded by "Admits," indicating that the patient does have these symptoms.
Each symptom listed is preceded by "Denies," indicating that the patient does not have these symptoms.
- Neurologic:
A neurological assessment is a medical evaluation performed to assess the health and function of the nervous system. Admits: muscular weakness, incoordination, tingling or numbness

Each symptom listed is preceded by "Admits," indicating that the patient does have these symptoms.
Each symptom listed is preceded by "Denies," indicating that the patient does not have these symptoms.
- Musculoskeletal:
A musculoskeletal assessment is a medical evaluation performed to assess the health and function of the musculoskeletal system, which includes the bones, joints, muscles, tendons, and ligaments. This assessment is typically conducted by a healthcare professional, such as a doctor, physical therapist, or orthopedic specialist, to gather information about the patient's musculoskeletal health, identify potential issues, and guide diagnosis and treatment.

Each symptom listed is preceded by "Admits," indicating that the patient does have these symptoms.
Each symptom listed is preceded by "Denies," indicating that the patient does not have these symptoms.
- Endocrine:
An endocrine assessment is a medical evaluation conducted to assess the health and function of the endocrine system, which is a network of glands that produce and release hormones.

Each symptom listed is preceded by "Admits," indicating that the patient does have these symptoms.
Each symptom listed is preceded by "Denies," indicating that the patient does not have these symptoms.
- Psychiatric:
A psychiatric assessment is a medical evaluation conducted to assess an individual's mental health and well-being.

Each symptom listed is preceded by "Admits," indicating that the patient does have these symptoms.
Each symptom listed is preceded by "Denies," indicating that the patient does not have these symptoms.
- Heme-Lymph:
A heme-lymph assessment, also known as a hematologic and lymphatic assessment, is a medical evaluation performed to assess the health and function of the hematologic (blood-related) and lymphatic systems.

Each symptom listed is preceded by "Admits," indicating that the patient does have these symptoms.
Each symptom listed is preceded by "Denies," indicating that the patient does not have these symptoms.
- Allergic-Immunologic:
An allergic-immunologic assessment is a medical evaluation performed to assess an individual's allergic responses and immune system function.

Each symptom listed is preceded by "Denies," indicating that the patient does not have these symptoms.
- All Other Negative
All Others Negative" item indicates that the patient denies any symptoms or abnormalities for all other systems that were reviewed.

<content styleCode="Bold">Vitals</content>
The "Vitals" section is presented as a table with various vital sign measurements. It provides details about the date, time, blood pressure (BP) etc. In the table format.
- Date: The date on which the vital signs were recorded.
- Time: The time of day when the vital signs were recorded.
- BP: This attribute tells us the Blood Pressure of the patient.
- Position: The position of the patient during the measurement, such as sitting, standing, or lying down.
- Site: The location on the body where the blood pressure was measured.
- L\R: Left or Right. Indicates which side of the body the measurement was taken from.
- Cuff Size: The size of the blood pressure cuff used for the measurement.
- HR: Heart Rate. The number of heart beats per minute, indicating the rate at which the heart is pumping blood.
- RR: Respiratory Rate. The number of breaths taken per minute
- TEMP (F): Body Temperature measured in Fahrenheit.
- WT: Weight of the patient, often measured in pounds or kilograms.
- HT: Height of the patient, often measured in feet and inches or centimeters.
- BMI kg/m2: Body Mass Index. A measure of body weight relative to height, calculated by dividing weight in kilograms by height in meters squared (kg/m²).
- BSA m2: Body Surface Area. A calculated value based on height and weight, often used for dosing medications.
- O2 Sat: Oxygen Saturation. The level of oxygen saturation in the blood, measured as a percentage.
- FR L/min: Flow Rate of oxygen or air in liters per minute.
- FiO2: Fraction of Inspired Oxygen. The concentration of oxygen in the air or oxygen mixture being administered, often expressed as a percentage.
- HC: Head Circumference. The measurement around the head, often used in pediatric assessments.
<content styleCode="Bold">Physical Examination</content>
This content appears to be a medical documentation template for the "Physical Examination" section. and has sections and subheadings. See the below image for all the possible contents/lists.

- Constitutional:
Constitutional is category of examination generally encompasses an evaluation of the patient's overall general health and well-being.

- Eyes:
the "Eyes Assessment" section is presented with three subcategories: "Conj, Sclera, Lids," "Pupils and Irises," and "Funduscopic Exam." Each subcategory provides details about specific aspects of the patient's eye examination.

<content styleCode="Bold">Results</content>
It represents the summary of the tests performed on the patient to determine their health status or specific medical conditions. and has sections and subheadings. See the below image for all the possible contents/lists.

- In-Office Procedures:
These procedures are typically routine, relatively minor, and do not require the patient to be admitted to a hospital.

- Lab Procedures:
This indicates that a specific lab procedure was performed to measure the patient's glucose level.

<content styleCode="Bold">Historical Results</content>
"Historical Results" section refers to the past measurements or values of various health parameters that were recorded during previous assessments or visits. The results are presented in a tabular format. See the below image for all the possible values.

<content styleCode="Bold">Assessment</content>
It represents the summary of the tests, examinations, or assessments performed on the patient to determine their health status or specific medical conditions. and has sections and subheadings. See the below image for all the possible contents/lists.

<content styleCode="Bold"> Plan</content>
It represents the summary of the plan given to the patient. and has sections and subheadings. See the below image for all the possible contents/lists.

Orders: This section contains all the orders added to the patient for the visit.

Medications: This section contains the medications added to that note/visit.

<Item>: This tag contains the Medication Name, SIG and Dispense.
SIG: The SIG section of a prescription provides instructions for the patient on how to take the medication. The instructions may include the dosage, frequency, and route of administration.
DISP: The DISP section of a prescription tells the pharmacy how much medication to dispense to the patient. The amount of medication dispensed may depend on the dosage, frequency, and duration of treatment.
Instructions: This section talks about the additional instructions provided to the patient along with medications/treatment.

Disposition: Disposition refers to the patient's destination after their visit to the hospital or clinic. It can also refer to the patient's overall plan of care, including medications, follow-up appointments, and other treatment recommendations.

Associated Tasks: This section contains some additional tasks to be performed in future for this patient/visit.

Correspondence: The correspondence section in a clinical note is a record of any communication that has taken place between the patient's healthcare providers. This can include letters, emails, phone calls, and other forms of communication.

Consultation: This section is a summary of the information that contains the patient's primary care provider and another healthcare provider who was consulted for their opinion or advice.

Referrals: The referrals section in a clinical note is a record of the healthcare providers who have been consulted or who have been asked to provide care for the patient

Documentation for the 1016 BIN Type (Free Text) for Generic Document Types:
For documents uploaded or received from outside to PrimeSuite application, the Free Text (1016) will be different from the Clinical Note Free Text format.
Correspondence Note and Consultation Note (1005):
Header
- < levelone>: This is the root element of the xml structure. It encloses the entire content.
- < copyright >: This element contains copyright information for the content.
- <clinical_document_header>: The root element representing the clinical document header.
- <id>: Represents the ID of the document.
- Attributes:
- EX: The ID value (DocumentID_SequenceNumber, External Identifier).
- RT: The ID value (Coding System).
- <set_id>: Specifies the set ID of the document.
- Attributes:
- EX: The set ID value (DocumentID, External Identifier)
- RT: The ID value (Coding System).
- <version_nbr>: Indicates the version number of the document.
- Attributes:
- V: The version number.
- <document_type_cd>: Describes the type of the document.
- Attributes:
- gmtid: The GMT ID(DocTypeID).
- V: The value of the document type code (LoincCode).
- S: The ID value (Coding System).
- DN: The display name of the document type (Document TypeName).
- <organization>: Represents the organization associated with the document.
- Attributes:
- NM: The name of the organization.
- <origination_dttm>: Specifies the date and time of the document's origination.
- Attributes:
- V: The origination date and time value.
- <confidentialityCode>: Provides information about the confidentiality code of the
document.
- Attributes:
- code: The code value.
- displayName: The display name of the confidentiality.
- codeSystem: The code system value.
- codeSystemName: The name of the confidentiality code system.
- <patient_encounter>: Contains information about the patient encounter.
- <Id>: Contains the unique ID of the patient encounter.
- <encounter_tmr>: Represents the encounter date and time.
- Attributes:
- visit: Indicates whether it is a visit (true/false)
- V: The encounter date and time value.
- <service_locationr>: Holds the name of the service location where the
encounter took place.
- Attributes:
- V: The encounter date and time value.
- <location_address>: Contains the address information of the service
location.
- Attributes:
- address_line_1: Contains the first line of the address for the service
location.
- V: address_line_1 value
- address_line_2: If present, would contain the second line of the
address.
- V: address_line_2 value
- City: Specifies the name of the city where the service location is
situated
- V: City value
- state: Specifies the name of the state where the service location is
situated.
- V: address_line_1 value
- postal code: Holds the postal code associated with the service
location.
- V: postal code value
- <Phone Number>: Would hold the phone number associated with the encounter
if available.
- Attributes:
- V: Phone number value.
- <provider>: Represents information about a healthcare provider associated with a
patient encounter.
- <person>: Contains details about the individual healthcare provider.
- Attributes
- <id>: Provides an identifier for the provider.
- Attributes
- EX: this attribute appears to represent an identifier associated with the person
- RT: This attribute represents a reference type or identifier system for the person.
- <person_name>: Holds the name of the provider.
- <nm>: Contains components of the provider's name, such as given
name, middle name, family name, and suffix.
- Attributes
- GIV: Specifies the given name of the provider.
- MID: Would hold the middle name if present.
- FAM: Specifies the family name (surname) of the provider.
- SFX: Holds a suffix for the provider's name.
- <nm>: Contains components of the provider's name, such as given
name, middle name, family name, and suffix.
- <person_name.type_cd>: Indicates the type of the provider's name along
with a reference standard code.
- Attributes
- V: The V attribute represents the value of the person's name type.
- S: The S attribute seems to represent a reference standard code associated with the person's name type.
- <person>: Contains details about the individual healthcare provider.
- <legal_authenticator>: Represents the legal authenticator associated with the
document.
- <signature_cd>: Specifies the signature code.
- Attributes:
- V: The signature code value.
- <participation_tmr>: Indicates the participation date and time.
- Attributes:
- V: The participation date and time value.
- <id>: Represents the ID of the legal authenticator.
- Attributes:
- EX: The ID value.
- RT: The ID value (Coding System).
- <person>: Contains information about the person associated with the legal
authenticator.
- <person_name>: Represents the name of the person.
- <nm>: Contains the name components.
- <GIV>: Represents the given name.
- Attributes:
- V: The given name value.
- <MID>: Represents the middle name.
- Attributes:
- V: The middle name value.
- <FAM>: Represents the family name.
- Attributes:
- V: The family name value.
- <SFX>: Represents the name suffix.
- Attributes:
- V: The suffix value.
- <person_name.type_cd>: Specifies the type of the person’s name.
- Attributes:
- V: The type of code value.
- S: The ID value (Coding System).
- <signature_cd>: Specifies the signature code.
- <patient>: Contains details about the patient.
- <patient.type_cd>: Specifies the patient type code.
- Attributes:
- V: The patient type code value.
- <person>: Represents the person information of the patient.
- <id>: Represents the ID of the person.
- Attributes:
- EX: The ID value.
- RT: The ID value (Coding System).
- <person_name>:
- <nm>:
- <GIV>:
- Attributes:
- V: The given name value.
- <FAM>:
- Attributes:
- V: The family name value.
- <SFX>:
- Attributes:
- V: The Suffix value.
- <nm>:
- <person_name.type_cd >:
- Attributes:
- V: The type of code value.
- S: The ID Value (Coding System).
- <addr>: Represents the address information of the patient.
- <STR>: Represents the street address.
- Attributes:
- V: The street address value.
- <CTY>: Represents the city.
- Attributes:
- V: The city value.
- <STA>: Represents the state.
- Attributes:
- V: The state value.
- <ZIP>: Represents the ZIP code.
- Attributes:
- V: The ZIP code value.
- <telecom>: Represents the contact information of the patient.
- Attributes:
- V: The contact value.
- USE: The usage of the contact.
- <patient.type_cd>: Specifies the patient type code.
- <birth_dttm>: Specifies the birth date and time of the patient.
- Attributes:
- V: The birth date and time value.
- <pcp_name>: Represents the name of the primary care provider associated with the
patient.
- Attributes:
- V: The name value.
- <referring_name>: Represents the name of the referring provider associated with
the patient.
- Attributes:
- V: The name value.
- <administrative_gender_cd>: Indicates the administrative gender code of the
patient.
- Attributes:
Correspondence Note and Consultation Note (1016):
Every clinical document converted will have the two document files:
- Data File – This will have all the columns' details of a specific document row from Greenway PrimeSuite database table, except the actual documents’ raw content.
- Document File – This file is the actual document content created by the tool which is either created in PrimeSuite or uploaded to PrimeSuite.
 Sample
of Data File: In the sample image below, this is one row generated from “dbo.ClinicalBin” table with the
below columns:
Sample
of Data File: In the sample image below, this is one row generated from “dbo.ClinicalBin” table with the
below columns:
- PatientID,
- DocumentID,
- Sequence Number
- BinTypeID
The actual document content is not included in this file as that will be converted to the actual file. In this case it will generate an xml file as the bin type is 1016. See second row in above image.

Sample Document:

Document tag definitions:
<ClinicalNoteItem>: This is the root element of the xml structure, and this element represents a clinical note entry.
<footnote>: Contains the content of the clinical note item.
<content>: This content has the name of the document.
<paragraph>Custom Field: test1</paragraph>
This is the Custom Field where users can add any additional data about the note.
<paragraph>08/15/2023</paragraph>
This paragraph has the details of the patient visit.
<paragraph>Robert 1. Adams MD</paragraph>
This paragraph has the name of the recipient.
<paragraph>1001 City, 00000</paragraph>
This paragraph has address of recipient.
<paragraph>test, newest</paragraph>
This paragraph is the name of the patient.
<paragraph>Patient:</paragraph>
<paragraph>1001 AddressLine1</paragraph>
This paragraph has the adressLine1 of the patient.
<paragraph>1001 AddressLine2</paragraph>
This paragraph has the adressLine1 of the patient.
<paragraph>Cc:</paragraph>
This paragraph has the name of all the carbon copy(cc) selected. additional recipient is being sent a copy of a message or document.
<paragraph>
Arthur C. Gasses II MD
Martie Collins MD
Martin Echols MD
Rupert Giles MD
</paragraph>
<paragraph>Enc:</paragraph>
This paragraph refers to the documents or additional materials that are included with the main document.in this case 2 additional documents are attached.in this case Procedure Note and Rita Imported TIF.
<paragraph>
Procedure Note (08/16/2023)
Rita Imported TIF (08/16/2023)
</paragraph>
Header [1005 ~ Custom Note and Miscellaneous Note]:
This XML represents a section titled " Custom Note" with local markup elements. The local markup element may be empty or can contain sketchpads.
- < levelone>: This is the root element of the xml structure. It encloses the entire content.
- < copyright >: This element contains copyright information for the content.
- <clinical_document_header>: The root element representing the clinical document
header.
- <id>: Represents the ID of the document.
- Attributes:
- EX: The ID value (DocumentID_SequenceNumber, External Identifier).
- RT: The ID value(Coding System).
- <set_id>: Specifies the set ID of the document.
- Attributes:
- EX: The set ID value (DocumentID, External Identifier)
- RT: The ID value(Coding System).
- <version_nbr>: Indicates the version number of the document.
- Attributes:
- V: The version number.
- <document_type_cd>: Describes the type of the document.
- Attributes:
- gmtid: The GMT ID(DocTypeID).
- V: The value of the document type code(LoincCode).
- S: The ID value(Coding System).
- DN: The display name of the document type(Document TypeName).
- <organization>: Represents the organization associated with the document.
- Attributes:
- NM: The name of the organization.
- <origination_dttm>: Specifies the date and time of the document's origination.
- Attributes:
- V: The origination date and time value.
- <confidentialityCode>: Provides information about the confidentiality code of the
document.
- Attributes:
- code: The code value.
- displayName: The display name of the confidentiality.
- codeSystem: The code system value.
- codeSystemName: The name of the confidentiality code system.
- <patient_encounter>: Contains information about the patient encounter.
- <Id>: Contains the unique ID of the patient encounter.
- <encounter_tmr>: Represents the encounter date and time.
- Attributes:
- visit: Indicates whether it is a visit (true/false).
- V: The encounter date and time value.
- <service_locationr>: Holds the name of the service location where the
encounter took place.
- Attributes:
- V: The encounter date and time value.
- <location_address>: Contains the address information of the service
location.
- Attributes:
- address_line_1: Contains the first line of the address for the service
location.
- V: address_line_1 value
- address_line_2: If present, would contain the second line of the
address.
- V: address_line_2 value
- City: Specifies the name of the city where the service location is
situated
- V: City value
- state: Specifies the name of the state where the service location is
situated.
- V: address_line_1 value
- postal code: Holds the postal code associated with the service
location.
- V: postal code value
- <Phone Number>: Would hold the phone number associated with the
encounter if available.
- Attributes:
- V: Phone number value.
- <provider>: Represents information about a healthcare provider associated with a
patient encounter.
- <person>: Contains details about the individual healthcare provider.
- Attributes
- <id>: Provides an identifier for the provider.
- Attributes
- EX: this attribute appears to represent an identifier associated with the person
- RT: This attribute seems to represent a reference type or identifier system for the person.
- <person_name>: Holds the name of the provider.
- <nm>: Contains components of the provider's name, such as given
name, middle name, family name, and suffix.
- Attributes
- GIV: Specifies the given name of the provider.
- MID: Would hold the middle name if present.
- FAM: Specifies the family name (surname) of the provider.
- SFX: Holds a suffix for the provider's name.
- <person_name.type_cd>: Indicates the type of the provider's name
along with a reference standard code.
- Attributes
- V: The V attribute represents the value of the person's name type.
- S: The S attribute seems to represent a reference standard code associated with the person's name type.
- <person>: Contains details about the individual healthcare provider.
- <legal_authenticator>: Represents the legal authenticator associated with the
document.
- <signature_cd>: Specifies the signature code.
- Attributes:
- V: The signature code value.
- <participation_tmr>: Indicates the participation date and time.
- Attributes:
- V: The participation date and time value.
- <id>: Represents the ID of the legal authenticator.
- Attributes:
- EX: The ID value.
- RT: The ID value(Coding System).
- <person>: Contains information about the person associated with the legal authenticator.
- <person_name>: Represents the name of the person.
- <nm>: Contains the name components.
- <GIV>: Represents the given name.
- Attributes:
- V: The given name value.
- <MID>: Represents the middle name.
- Attributes:
- V: The middle name value.
- <FAM>: Represents the family name.
- Attributes:
- V: The family name value.
- <SFX>: Represents the name suffix.
- Attributes:
- V: The suffix value.
- <person_name.type_cd>: Specifies the type of the person’s name.
- Attributes:
- V: The type of code value.
- S: The ID value(Coding System).
- <nm>: Contains the name components.
- <signature_cd>: Specifies the signature code.
- <patient>: Contains details about the patient.
- <patient.type_cd>: Specifies the patient type code.
- Attributes:
- V: The patient type code value.
- <person>: Represents the person information of the patient.
- <id>: Represents the ID of the person.
- Attributes:
- EX: The ID value.
- RT: The ID value(Coding System).
- <person_name>:
- <nm>:
- <GIV>:
- Attributes:
- V: The given name value.
- <FAM>:
- Attributes:
- V: The family name value.
- <SFX>:
- Attributes:
- V: The suffix value.
- <person_name.type_cd>:
- Attributes:
- V: The type of code value.
- S: The ID Value(Coding System).
- <addr>: Represents the address information of the patient.
- <STR>: Represents the street address.
- Attributes:
- V: The street address value.
- <CTY>: Represents the city.
- Attributes:
- V: The city value.
- <STA>: Represents the state.
- Attributes:
- V: The state value.
- <ZIP>: Represents the ZIP code.
- Attributes:
- V: The ZIP code value.
- <telecom>: Represents the contact information of the patient.
- Attributes:
- V: The contact value.
- USE: The usage of the contact.
- <nm>:
- <patient.type_cd>: Specifies the patient type code.
- <birth_dttm>: Specifies the birth date and time of the patient.
- Attributes:
- V: The birth date and time value.
- <pcp_name>: Represents the name of the primary care provider associated with the
patient.
- Attributes:
- V: The name value.
- <referring_name>: Represents the name of the referring provider associated with
the patient.
- Attributes:
- V: The name value.
- <administrative_gender_cd>: Indicates the administrative gender code of the
patient.
- Attributes:
- V: The gender value.
- S: The ID value(Coding System).
Custom Note:
<section> element
- The <caption> element represents the caption or title of the section, which is " Custom Note ".
- There is a <local_markup> elements within the section.
- Within the <local_markup> element, there is an XML structure represented
as a string. The XML structure includes:
- <sketchpads>: Represents a collection of sketchpads.
- Attributes:
- Title: Specifies the title of the note.
- Doctypeid: Specifies the Document type ID.
- Doctypename: Specifies the Document type name.
- <sketchpads>: Represents a single sketchpad.
- Attributes:
- seq: Specifies the sequence number of the sketchpad.
- canvasheight: Specifies the canvas height of the sketchpad.
- expandcount: Specifies the expand count of the sketchpad.
- <text>: Represents text data associated with the
sketchpad.
- Attributes:
- data: Contains the text data.
- <canvas>: Represents a canvas element.
- <sketchpads>: Represents a collection of sketchpads.
- Within the <local_markup> element, there is an XML structure represented
as a string. The XML structure includes:
Miscellaneous Note:
Miscellaneous notes related to a patient's medical record or treatment.
This XML represents a titled “Miscellaneous note” with local markup elements.
- There are <local_markup> elements within the note that include things like patient preferences, informal observations, specific instructions, or any other information that does not have a dedicated section in the medical record system. They serve to provide a more complete picture of the patient's health status and care requirements.
[1016 ~ Custom Note]:
<ClinicalNoteItem> element
- The <Footnote> element includes the count of content elements it holds, along
with the text data linked to the note.
- <content> element represents the caption or title of the document type, which is "Discharge Summary Note".
Health Risk Assessment (HRA)
Sample Document:

Document tag definitions:
The above picture contains tags that are related to patient demographics.
- <MessageControlID>: Identification for message control within the system. Value: MSG1001.
- <ProgramID>: Identification for the health program. Value: 50107.
- <ExternalID>: External identification for the patient. Value: 19465.
- <LastName>: Last name of the patient. Value: Bush.
- <FirstName>: First name of the patient. Value: Laura.
- <MiddleName>: Middle name of the patient.
- <Suffix>: Suffix (e.g., Jr., Sr.) for the patient's name.
- <Prefix>: Prefix (e.g., Mr., Mrs.) for the patient's name.
- <DOB>: Date of birth of the patient. Value: 11/04/1946.
- <Gender>: Gender of the patient.
- <Race>: Race information of the patient.
- <SSN>: Social Security Number of the patient. Value: 243434343.
- <HomePhone>: Patient's home phone number.
- <WorkPhone>: Patient's work phone number.
- <Email>: Patient's email address.
- <Address>: Patient's address information.
- Attributes
After this we have various health-related observations and information about an individual. The data is organized into different sections. See the below image for all the possible sections.

- <Sections>
- <Section>: Represents a specific section within the HRA data.
- <SectionName>: Name of the section. Value: Biometric Measures.
- <SectionDateTime>: Date and time when this section was recorded. Value: 01/12/2014 12:48.
- <ReportingOnly>: Indication of whether this section is for reporting purposes only.
- <Observations>: This tag contains all the observations inside it.
- <Observation>: Represents a specific observation within
the section. Each observation contains information about a specific
health-related attribute.
- <ID>: Unique identification for the observation. Value: 2.
- <ParentID>: Parent identification for hierarchical observations.
- <SequenceID>: Sequence identification for ordering observations within the section. Value: 1.
- <Text>: Description of the observation. Value: Reporting Method:
- <Value>: Value associated with the observation. Value: Self-Reported.
- <Observation>: Represents the next observation in the
sequence. Each observation contains information about a specific health-related
attribute.
- <ID>: Unique identification for the observation. Value: 3.
- <ParentID>: Parent identification for hierarchical observations.
- <SequenceID>: Sequence identification for ordering observations within the section. Value: 2.
- <Text>: Description of the observation. Value: Fasting Status:
- <Value>: Value associated with the observation. Value: Non-Fasting.
- <Observation>: Represents the next observation in the
sequence. Each observation contains information about a specific health-related
attribute.
- <ID>: Unique identification for the observation. Value: 4.
- <ParentID>: Parent identification for hierarchical observations.
- <SequenceID>: Sequence identification for ordering observations within the section. Value: 3.
- <Text>: Description of the observation. Value: Overall Wellness Score:
- <Value>: Value associated with the observation. Value: 80.
- <Observation>: Represents the next observation in the
sequence. Each observation contains information about a specific health-related
attribute.
- <ID>: Unique identification for the observation. Value: 5.
- <ParentID>: Parent identification for hierarchical observations.
- <SequenceID>: Sequence identification for ordering observations within the section. Value: 4.
- <Text>: Description of the observation. Value: HRA Completion Date:
- <Value>: Value associated with the observation. Value: 01/10/2014.
- <Observation>: Represents the next observation in the
sequence. Each observation contains information about a specific health-related
attribute.
- <ID>: Unique identification for the observation. Value: 6.
- <ParentID>: Parent identification for hierarchical observations.
- <SequenceID>: Sequence identification for ordering observations within the section. Value: 5.
- <Text>: Description of the observation. Value: Age
- <Value>: Value associated with the observation. Value: 68.
- <Observation>: Represents the next observation in the
sequence. Each observation contains information about a specific health-related
attribute.
- <ID>: Unique identification for the observation. Value: 7.
- <ParentID>: Parent identification for hierarchical observations.
- <SequenceID>: Sequence identification for ordering observations within the section. Value: 6.
- <Text>: Description of the observation. Value: Gender:
- <Value>: Value associated with the observation. Value: Female
- <Observation>: Represents the next observation in the
sequence. Each observation contains information about a specific health-related
attribute.
- <ID>: Unique identification for the observation. Value: 8.
- <ParentID>: Parent identification for hierarchical observations.
- <SequenceID>: Sequence identification for ordering observations within the section. Value: 7.
- <Text>: Description of the observation. Value: Ethnic Origin:
- This observation provides information about the individual's ethnic origin, indicating that the individual's ethnic background
- <Value>: Value associated with the observation. Value: Caucasian.
- <Observation>: Represents the next observation in the
sequence. Each observation contains information about a specific health-related
attribute.
- <ID>: Unique identification for the observation. Value: 9.
- <ParentID>: Parent identification for hierarchical observations.
- <SequenceID>: Sequence identification for ordering observations within the section. Value: 8.
- <Text>: Description of the observation. Value: Self-rate current state of health:
- This observation records the individual's self-rated current state of health
- <Value>: Value associated with the observation. Value: Fair.
- <Observation>: Represents a specific observation within
the section. Each observation contains information about a specific
health-related attribute.
- <Section>: Represents a next specific section within the HRA data.
- <SectionName>: Name of the section. Value: Tobacco Behavior.
- <SectionDateTime>: Date and time when this section was recorded. Value: 01/12/2014 12:48.
- <ReportingOnly>: Indication of whether this section is for reporting purposes only.<Observations>: This tag contains all the observations inside it.
- <Observation>: Represents a specific observation within the
section. Each observation contains information about a specific health-related
attribute.
- <ID>: Unique identification for the observation. Value: 20.
- <ParentID>: Parent identification for hierarchical observations.
- <SequenceID>: Sequence identification for ordering observations within the section. Value: 19.
- <Text>: Description of the observation. Value: Smoking History:
- This observation records the individual's smoking history,
- <Value>: Value associated with the observation. Value: Never.
- <Observation>: Represents a specific observation within the
section. Each observation contains information about a specific health-related
attribute.
- <ID>: Unique identification for the observation. Value: 21.
- <ParentID>: Parent identification for hierarchical observations.
- <SequenceID>: Sequence identification for ordering observations within the section. Value: 20.
- <Text>: Description of the observation. Value: Number of cigarettes smoking per day:
- This observation records the individual's Number of cigarettes smoking per day,
- <Value>: Value associated with the observation. Value: N/A.
- <Observation>: Represents a specific observation within the
section. Each observation contains information about a specific health-related
attribute.
- <ID>: Unique identification for the observation. Value: 22.
- <ParentID>: Parent identification for hierarchical observations.
- <SequenceID>: Sequence identification for ordering observations within the section. Value: 21.
- <Text>: Description of the observation. Value: How many cigars or pipes do you smoke per day:
- This observation captures the individual's behavior regarding cigars or pipes smoking,
- <Value>: Value associated with the observation. Value: None.
- <Observation>: Represents a specific observation within the
section. Each observation contains information about a specific health-related
attribute.
- <ID>: Unique identification for the observation. Value: 23.
- <ParentID>: Parent identification for hierarchical observations.
- <SequenceID>: Sequence identification for ordering observations within the section. Value: 22.
- <Text>: Description of the observation. Value: How many times a day do you use smokeless tobacco (snuff or chewing tobacco):
- This observation records the individual's usage of smokeless tobacco, specifically snuff or chewing tobacco
- <Value>: Value associated with the observation. Value: None.
- <Section>: Represents a next specific section within the HRA data.
- <SectionName>: Name of the section. Value: Readiness to Change.
- <SectionDateTime>: Date and time when this section was recorded. Value: 01/12/2014 12:48.
- <ReportingOnly>: Indication of whether this section is for reporting purposes only.
- <Observations>: This tag contains all the observations inside it.
- <Observation>: Represents a specific observation within
the section. Each observation contains information about a specific
health-related attribute.
- <ID>: Unique identification for the observation. Value: 24.
- <ParentID>: Parent identification for hierarchical observations.
- <SequenceID>: Sequence identification for ordering observations within the section. Value: 23.
- <Text>: Description of the observation. Value: Do you plan to make any changes to maintain or improve your health related to:
- This observation presents a question about the individual's intentions to make health-related changes.
- <Value>: Value associated with the observation. Value: Nil.
- The value is marked as not applicable (nil), suggesting that there is no specific value provided in this instance.
- <Observation>: Represents a specific observation within
the section. Each observation contains information about a specific
health-related attribute.
- <ID>: Unique identification for the observation. Value: 25.
- <ParentID>: Parent identification for hierarchical observations. Value: 24
- <SequenceID>: Sequence identification for ordering observations within the section. Value: 23.
- <Text>: Description of the observation. Value: Diet and Nutrition:
- This observation presents a question about the individual's Diet and Nutrition
- <Value>: Value associated with the observation. Value: Next 6 months.
- <Observation>: Represents a specific observation within
the section. Each observation contains information about a specific
health-related attribute.
- <ID>: Unique identification for the observation. Value: 26.
- <ParentID>: Parent identification for hierarchical observations. Value: 24
- <SequenceID>: Sequence identification for ordering observations within the section. Value: 24.
- <Text>: Description of the observation. Value: Exercise:
- This observation here refers to physical activity or movement that is purposefully done to improve health
- <Value>: Value associated with the observation. Value: Next 6 months.
- <Observation>: Represents a specific observation within
the section. Each observation contains information about a specific
health-related attribute.
- <ID>: Unique identification for the observation. Value: 27.
- <ParentID>: Parent identification for hierarchical observations. Value: 24
- <SequenceID>: Sequence identification for ordering observations within the section. Value: 25.
- <Text>: Description of the observation. Value: Stress:
- the observation is centered around the topic of stress.
- <Value>: Value associated with the observation. Value: Recently made a change.
- <Observation>: Represents a specific observation within
the section. Each observation contains information about a specific
health-related attribute.
- <ID>: Unique identification for the observation. Value: 28.
- <ParentID>: Parent identification for hierarchical observations. Value: 24
- <SequenceID>: Sequence identification for ordering observations within the section. Value: 26.
- <Text>: Description of the observation. Value: Tobacco Use:
- the observation is centered around the Individual tobacco uses.
- <Value>: Value associated with the observation. Value: Already maintaining healthy habits.
- <Observation>: Represents a specific observation within
the section. Each observation contains information about a specific
health-related attribute.
- <ID>: Unique identification for the observation. Value: 29.
- <ParentID>: Parent identification for hierarchical observations. Value: 24
- <SequenceID>: Sequence identification for ordering observations within the section. Value: 27.
- <Text>: Description of the observation. Value: Weight Management:
- The observation is centered around Individual Weight Management.
- <Value>: Value associated with the observation. Value: Next 30 days.
- <Observation>: Represents a specific observation within
the section. Each observation contains information about a specific
health-related attribute.
- <ID>: Unique identification for the observation. Value: 30.
- <ParentID>: Parent identification for hierarchical observations. Value: 24
- <SequenceID>: Sequence identification for ordering observations within the section. Value: 28.
- <Text>: Description of the observation. Value: Alcohol Use:
- The observation is centered around Individual Alcohol Use.
- <Value>: Value associated with the observation. Value: Not interested.
- <Observation>: Represents a specific observation within
the section. Each observation contains information about a specific
health-related attribute.
- <Section>: Represents a next specific section within the HRA data.
- <SectionName>: Name of the section. Value: Lifestyle Nutrition.
- <SectionDateTime>: Date and time when this section was recorded. Value: 01/12/2014 12:48.
- <ReportingOnly>: Indication of whether this section is for reporting purposes only.
- <Observations>: This tag contains all the observations inside it.
- <Observation>: Represents a specific observation within
the section. Each observation contains information about a specific
health-related attribute.
- <ID>: Unique identification for the observation. Value: 31.
- <ParentID>: Parent identification for hierarchical observations.
- <SequenceID>: Sequence identification for ordering observations within the section. Value: 29.
- <Text>: Description of the observation. Value: How many servings do you eat from the following food groups:
- This observation presents a question about the individual's servings from the following food groups:
- <Value>: Value associated with the observation. Value: Nil.
- The value is marked as not applicable (nil), suggesting that there is no specific value provided in this instance.
- <Observation>: Represents a specific observation within
the section. Each observation contains information about a specific
health-related attribute.
- <ID>: Unique identification for the observation. Value: 32.
- <ParentID>: Parent identification for hierarchical observations. Value: 31
- <SequenceID>: Sequence identification for ordering observations within the section. Value: 29.
- <Text>: Description of the observation. Value: Fruits: 1 medium piece or 1/2 cup chopped:
- This observation presents an eating habit of the individual
- <Value>: Value associated with the observation. Value: 1-4 per week.
- <Observation>: Represents a specific observation within
the section. Each observation contains information about a specific
health-related attribute.
- <ID>: Unique identification for the observation. Value: 34.
- <ParentID>: Parent identification for hierarchical observations. Value: 31
- <SequenceID>: Sequence identification for ordering observations within the section. Value: 31.
- <Text>: Description of the observation. Value: Protein: meat, chicken, nuts, beans:
- This observation presents an eating habit of the individual
- <Value>: Value associated with the observation. Value: 1-4 per week.
- <Observation>: Represents a specific observation within
the section. Each observation contains information about a specific
health-related attribute.
- <ID>: Unique identification for the observation. Value: 35.
- <ParentID>: Parent identification for hierarchical observations. Value: 31
- <SequenceID>: Sequence identification for ordering observations within the section. Value: 32.
- <Text>: Description of the observation. Value: Protein: meat, chicken, nuts, beans:
- This observation presents an eating habit of the individual
- <Value>: Value associated with the observation. Value: 1-4 per week.
- <Observation>: Represents a specific observation within
the section. Each observation contains information about a specific
health-related attribute.
- <ID>: Unique identification for the observation. Value: 36.
- <ParentID>: Parent identification for hierarchical observations. Value: 31
- <SequenceID>: Sequence identification for ordering observations within the section. Value: 33.
- <Text>: Description of the observation. Value: Simple carbohydrates: white bread, white rice, processed cereal, pasta:
- This observation presents an eating habit of the individual
- <Value>: Value associated with the observation. Value: None
- <Observation>: Represents a specific observation within
the section. Each observation contains information about a specific
health-related attribute.
- <ID>: Unique identification for the observation. Value: 36.
- <ParentID>: Parent identification for hierarchical observations. Value: 31
- <SequenceID>: Sequence identification for ordering observations within the section. Value: 34.
- <Text>: Description of the observation. Value: Dairy: milk, cheese, yogurt:
- This observation presents an eating habit of the individual
- <Value>: Value associated with the observation. Value: 5-7 per week
- <Observation>: Represents a specific observation within
the section. Each observation contains information about a specific
health-related attribute.
- <ID>: Unique identification for the observation. Value: 38.
- <ParentID>: Parent identification for hierarchical observations. Value: 31
- <SequenceID>: Sequence identification for ordering observations within the section. Value: 35.
- <Text>: Description of the observation. Value: Processed meats: hotdogs, lunch meats, bacon:
- This observation presents an eating habit of the individual
- <Value>: Value associated with the observation. Value: 1-4 per week
- <Observation>: Represents a specific observation within
the section. Each observation contains information about a specific
health-related attribute.
- <ID>: Unique identification for the observation. Value: 39.
- <ParentID>: Parent identification for hierarchical observations. Value: 31
- <SequenceID>: Sequence identification for ordering observations within the section. Value: 36.
- <Text>: Description of the observation. Value: Fried foods: French fries, fried chicken, chips:
- This observation presents an eating habit of the individual
- <Value>: Value associated with the observation. Value: 1-4 per week
- <Observation>: Represents a specific observation within
the section. Each observation contains information about a specific
health-related attribute.
- <ID>: Unique identification for the observation. Value: 40.
- <ParentID>: Parent identification for hierarchical observations. Value: 31
- <SequenceID>: Sequence identification for ordering observations within the section. Value: 37.
- <Text>: Description of the observation. Value: Fats: cream, butter, sauces, shortening:
- This observation presents an eating habit of the individual
- <Value>: Value associated with the observation. Value: 1-4 per week
- <Observation>: Represents a specific observation within
the section. Each observation contains information about a specific
health-related attribute.
- <ID>: Unique identification for the observation. Value: 41.
- <ParentID>: Parent identification for hierarchical observations. Value: 31
- <SequenceID>: Sequence identification for ordering observations within the section. Value: 38.
- <Text>: Description of the observation. Value: Sweets and desserts: cookies, cake, donuts, candy:
- This observation presents an eating habit of the individual
- <Value>: Value associated with the observation. Value: 3 per day
- <Observation>: Represents a specific observation within
the section. Each observation contains information about a specific
health-related attribute.
- <Section>: Represents a next specific section within the HRA data.
- <SectionName>: Name of the section. Value: Lifestyle Exercise.
- <SectionDateTime>: Date and time when this section was recorded. Value: 01/12/2014 12:48.
- <ReportingOnly>: Indication of whether this section is for reporting purposes only.
- <Observations>: This tag contains all the observations inside it.
- <Observation>: Represents a specific observation within
the section. Each observation contains information about a specific
health-related attribute.
- <ID>: Unique identification for the observation. Value: 45.
- <ParentID>: Parent identification for hierarchical observations.
- <SequenceID>: Sequence identification for ordering observations within the section. Value: 42.
- <Text>: Description of the observation. Value: How many days a week do you do at least 20-30 minutes of physical activity, without stopping, in which you breathe heavier and your heart beats faster?
- This observation presents a determine how frequently the individual engages in a specific type of physical activity
- <Value>: Value associated with the observation. Value: 1 to 2 per week.
- <Observation>: Represents a specific observation within
the section. Each observation contains information about a specific
health-related attribute.
- <Section>: Represents a next specific section within the HRA data.
- <SectionName>: Name of the section. Value: Lifestyle Alcohol.
- <SectionDateTime>: Date and time when this section was recorded. Value: 01/12/2014 12:48.
- <ReportingOnly>: Indication of whether this section is for reporting purposes only.
- <Observations>: This tag contains all the observations inside it.
- <Observation>: Represents a specific observation within
the section. Each observation contains information about a specific
health-related attribute.
- <ID>: Unique identification for the observation. Value: 46.
- <ParentID>: Parent identification for hierarchical observations.
- <SequenceID>: Sequence identification for ordering observations within the section. Value: 43.
- <Text>: Description of the observation. Value: Indicate the average number of alcoholic beverages that you consume in a week:
- This observation presents a determine how frequently the individual drinks alcohol.
- <Value>: Value associated with the observation. Value: 1 to 2 drinks.
- <Observation>: Represents a specific observation within
the section. Each observation contains information about a specific
health-related attribute.
- <ID>: Unique identification for the observation. Value: 47.
- <ParentID>: Parent identification for hierarchical observations.
- <SequenceID>: Sequence identification for ordering observations within the section. Value: 44.
- <Text>: Description of the observation. Value: If you drink alcohol, do you ever drink more than 5 drinks at a time?
- This observation aims to gather information about the respondent's alcohol consumption habits.
- <Value>: Value associated with the observation. Value: 1 to 2 drinks.
- <Observation>: Represents a specific observation within
the section. Each observation contains information about a specific
health-related attribute.
- <Section>: Represents a next specific section within the HRA data.
- <SectionName>: Name of the section. Value: Lifestyle Stress.
- <SectionDateTime>: Date and time when this section was recorded. Value: 01/12/2014 12:48.
- <ReportingOnly>: Indication of whether this section is for reporting purposes only.
- <Section>: Represents a next specific section within the HRA data.
- <SectionName>: Name of the section. Value: Personal Health.
- <SectionDateTime>: Date and time when this section was recorded. Value: 01/12/2014 12:48.
- <ReportingOnly>: Indication of whether this section is for reporting purposes only.
- <Section>: Represents a next specific section within the HRA data.
- <SectionName>: Name of the section. Value: Clinical Information.
- <SectionDateTime>: Date and time when this section was recorded. Value: 01/12/2014 12:48.
- <ReportingOnly>: Indication of whether this section is for reporting purposes only.
- <Section>: Represents a next specific section within the HRA data.
- <SectionName>: Name of the section. Value: Health at Work.
- <SectionDateTime>: Date and time when this section was recorded. Value: 01/12/2014 12:48.
- <ReportingOnly>: Indication of whether this section is for reporting purposes only.
- <Section>: Represents a specific section within the HRA data.
Lab Result Documentation (1000 BinType)
The below documents can be created in PrimeSuite and will be stored in GMT(XML) format in the database.
- Inbound Electronics Lab
- Radiology/Imaging Reports
- Pathology Reports
- QTPLabResult
- Urinalysis
- CBC Report
Every clinical document converted will have the two document files:
- Data File – This will have all the columns' details of a specific document row from Greenway PrimeSuite database table, except the actual documents’ raw content.
- Document File – This file is the actual document content created by the tool which is either created in PrimeSuite or uploaded to PrimeSuite.

Input File: -

And

Converted File: -


Explanation of each Tag and its attributes of the Converted file is as below:

<labresult id="D76EBE82-3318-4FC8-BA11-5786FCCD8E23">: This is the root element of the lab result record, and it contains a unique identifier ("id") for this specific lab result.
<labheader>:
- labcompanyname: The name of the laboratory company responsible for conducting the tests ("LabDaq" in this case).
- labcompayclientid: An identifier for the client of the laboratory company.
- containsabnormal: Indicates whether the lab result contains abnormal findings (true or false).
- doctype: The type of document, which is a laboratory report ("LAB").
- subdoctype: Further classification of the document as "General Lab."
- displaytype: The type of display for the lab result ("LabResult").

<labcompany>:
- name: The name of the medical centre or laboratory ("Floyd Medical Centre").
- id: An identifier for the laboratory
- phone: Contact phone number for the medical centre ("706-509-5810").
- director: Name and CLIA (Clinical Laboratory Improvement Amendments) number of the laboratory director ("Dr. Steven Hom-CLIA# 11D0256788").

<address>:
- addressline1: This attribute stores the first line of the lab’s address, typically including the house or building number and street name ("304 Turner McCall Blvd. ").
- addressline2: This attribute stores additional address information, such as an apartment number, suite, or any other relevant details that help specify the location (e.g., "Apt 4B").
- City: This attribute stores the name of the city or locality where the patient resides ("Rome ").
- State: This attribute stores the abbreviation or full name of the state or province where the patient lives (e.g., "CA" for California).
- Zip code: This attribute stores the postal code or ZIP code associated with the patient's address (e.g., "30165").


<patient>:
- labid: Laboratory-specific patient identifier.
- primesuiteid: Identifier related to a medical software suite.
- prefix, full name, last name, first name, middle name, suffix: Patient's name
components.

- dob: Date of birth ("03/24/1988").
- mothersmaidenname: Mother's maiden name.
- sex: Patient's gender ("Female").
- Phone: Patient's contact phone number
- SSN: Social Security Number (SSN) of a patient
- PatientID: An additional patient identifier.

<address>:
- addressline1: This attribute stores the first line of the patient's address, typically including the house or building number and street name (e.g., "123 Main Street").
- addressline2: This attribute stores additional address information, such as an apartment number, suite, or any other relevant details that help specify the location (e.g., "Apt 4B").
- City: This attribute stores the name of the city or locality where the patient resides (e.g., "Los Angeles").
- State: This attribute stores the abbreviation or full name of the state or province where the patient lives (e.g., "CA" for California).
- Zip code: This attribute stores the postal code or ZIP code associated with the patient's address (e.g., "90001").

<order>:
- gmtorderid: Order identifier in a specific format ("301211.1026.1").
- laborderid: Laboratory-specific order identifier.

<ordering provider>:
- Last name: Last name of the ordering provider.
- first name: First name of the ordering provider.
- Middle name: Middle name of the ordering provider.
- full name: Full name of the ordering provider.
- id: Identifier for the ordering provider.


<specimen>:
- Date taken: The date and time the specimen was taken (May 1, 2014, 11:54 AM).
- date received: The date and time the specimen was received (April 27, 2014, 11:54 AM).
- Date reported: The date and time the results for the specimen were reported (March 7, 2014, 11:57:06 AM).
- Relevant Clinical Information: Relevant clinical information associated with the specimen.
- Specimenactioncode: Action Code associated with the specimen.
- specimen number: Identifier for the specimen.

<Specimen Source>

<Specimen Source Name>:
- ID: This is an identifier that likely corresponds to a specific code for the type of specimen source. In this case, the ID 153 might represent "Blood."
- Description: This provides a human-readable description of the specimen source, which in this case is "Blood."
- Coding System: This attribute contains the coding system used for the ID value.
- AlternateID: This attribute contains an alternative identifier for the specimen source, perhaps in a different coding system.
- Alternate Description: This contains an alternative description for the specimen source, which might be used in cases where the primary description ("Blood") does not align with a particular system's terminology.
- AlternateCodingSystem: This specifies the coding system or terminology standard used
for the alternate identifier or description

<BodySite>:
- ID: This is an identifier that likely corresponds to a specific code for the body site. The ID 300045 might correspond to a particular body site.
- Description: It provides a human-readable description of the body site if needed.
- Coding System: This attribute contains the coding system used for the ID value of the body site.
- AlternateID: This attribute contains an alternative identifier for the anatomical body site in a different coding system or terminology.
- Alternate Description: This attribute contains an alternative description for the anatomical body site. It might be used when the primary description is not suitable for a particular system or if additional information is required.
- AlternateCodingSystem: This attribute specifies the coding system or terminology standard used for the alternate identifier or description.

<panel>:
- id: Identifier for the lab panel.
- name: Name of the lab panel ("Haemoglobin").
- ParentPanelNO: Identifier of the parent panel.
- labgenerated: Indicates whether the panel was generated in the lab (0 or 1).
- reportstatus: Status of the lab report ("Corrected").


<result>:
- id: Identifier for the specific lab test result.
- name: Name of the lab test ("Hgb Bld-mCnc").
- coding system: Coding system used for the result (e.g., LOINC).
- abnormal: Indicates if the result is abnormal (0 for normal, 1 for abnormal).
- value: Numeric value of the result ("15").
- value type: Type of the value (NM for numeric).
- range: Normal reference range for the result ("10-20").
- result status: Status of the result (F for Final).
- labid: Specific ID related to result (“Piedmont Endocrinology P.A”)
- date: Date of the results
- units: Units of measurement ("g/dL").
- natureofabnormaltest: Description of the nature of the abnormal test result.

<notes>:
- value: Contains various notes and information about the test results, clinical details, impressions, and other details of the radiology report.

<flags>:
-
- value: This section indicates any flags associated with the test result, such as abnormal findings or specific conditions (H)
Lab Result Documentation (1016)
The below documents can be created in PrimeSuite and will be stored in GMT(XML) format in the database.
- Inbound Electronics Lab
- Radiology/Imaging Reports
- Pathology Reports
- QTPLabResult
- Urinalysis
- CBC Report
Every clinical document exported / converted will have the two document files:
- Data File – This will have all the columns' details of a specific document row from Greenway PrimeSuite database table, except the actual documents’ raw content.
- Document File – This file is the actual document content created by the tool which is either created in PrimeSuite or uploaded to PrimeSuite.

Sample of Data File: In the sample image below, this is one row generated from “dbo.ClinicalBin” table with the below columns:
- PatientID,
- DocumentID,
- Sequence Number
- BinTypeID
The actual document content is not included in this file as that will be converted to the actual file. In this case, it will generate an xml file as the bin type is 1016. See second row in above image.

Sample Document:

Document tag definitions:

In this context, the XML-like structure is instructing a system to generate the text "Lab Report" as a bold and underlined title, which might be used to introduce a section of clinical notes or documentation related to a patient's lab test results.

- "Piedmont Endocrinology, P.A. - Lab - General Lab": This is the name or identifier of the medical facility or laboratory where the tests were conducted. It identifies the source of the lab results.
- "Specimen #: 53128": This line combines the label "Specimen #" with the corresponding specimen number "53128" on the same line. It indicates that the number "53128" is related to the specimen (sample) associated with the patient's lab tests.
- "Report Status: Final Results": This line provides the label "Report Status" followed by the status "Final Results." It indicates that the lab report is in its final form and contains the conclusive results of the tests conducted.

The above picture contains tags that are related to patient demographics.
That may include.
- Patient name
- PatientID
- Sex
- DOB
- Address
- Phone No

- Date of Specimen: The date when the specimen was collected from the patient.
- Date Received: The date and time when the specimen was received in the Lab.
- Specimen Source: This description of the specimen source (example: Blood)
- Date Reported: The date and time the results for the specimen were reported.
- Physician: The Physician details who conducted the specimen testing

- GMT Order ID: Order ID of the requested lab result

The above content consists of test details and test results, below are the description.
- Test Name : lab test taken by the patient.
- Result : result of the test taken
- Flags : refers to the severity level
- Reference Range : reference scale for the test result
- Lab : Laboratory name where test is done
Inside the tags <tbody> the above content is inserted accordingly

- The above image with respective tags contains the lab details where the test is taken.
This includes the details of lab such as
- Lab Name
- Lab Director
- Address of lab
- Phone number of lab
Conclusion:
In this documentation, we have examined an example of an XML representation of a clinical lab report. The XML content is structured to present various pieces of information about the patient, specimen, and report details. Each line of the XML content was explained as follows:
- The XML document begins with the <ClinicalNoteItem> tag, signifying the start of the clinical note item.
- The <footnote> tag opens a section where additional notes or information about the clinical report can be included.
- Various <content> tags with styleCode attributes are used to apply formatting, such as bold and underline, to the content within.
- Specific information such as "Lab Report," "Piedmont Endocrinology, P.A. - Lab - General Lab," specimen numbers, report status, patient information, name, patient ID, sex, date of birth, and more are presented in a structured manner.
- The use of line breaks (represented by <br />) enhances the readability by creating new lines for different sections.
- Notable sections include patient information, date of specimen collection, date received, specimen source, date reported, and physician details.
- Some sections, such as "Address," "Phone #," "Specimen Source," and "GMT Order ID," appear to be empty in the provided content.
- The document concludes with proper closure of the opened tags and the end of the <ClinicalNoteItem> element.
This example illustrates how XML can be utilized to structure and present medical information in a standardized and easily parsable format. Properly closed tags ensure the integrity of the data and facilitate consistent data interpretation and analysis.
Lab Flowsheet Documentation
Below are the few steps involved during the extraction and conversion process.
- The raw data which are stored in binary format in the database are exported as xml files with base64 content for both ‘single patient’ and ‘patient population’
Single patient:
Holds all the tables data in PS related to the patient and their information (Data and Document).
Population patient:
Holds the files/document data in binary format related to the patient (only Document).
- The below illustration is the XML output that is generated for binType [1005:Lab Flowsheet] by the
‘Export Converter’ tool.
Reference section holds the sample files (input, output).
Header [1005 ~ Progress Note]:
- <clinical_document_header>: The root element representing the clinical document header.
- <id>: Represents the ID of the document.
- Attributes:
- EX: The ID value (DocumentID_SequenceNumber, External Identifier).
- RT: The ID value (Coding System).
- Attributes:
- <set_id>: Specifies the set ID of the document.
- Attributes:
- EX: The set ID value (DocumentID, External Identifier)
- RT: The ID value (Coding System).
- Attributes:
- <version_nbr>: Indicates the version number of the document.
- Attributes:
- V: The version number.
- Attributes:
- <document_type_cd>: Describes the type of the document.
- Attributes:
- gmtid: The GMT ID(DocTypeID).
- V: The value of the document type code (LoincCode).
- S: The ID value (Coding System).
- DN: The display name of the document type (Document TypeName).
- Attributes:
- <organization>: Represents the organization associated with the document.
- Attributes:
- NM: The name of the organization.
- Attributes:
- <origination_dttm>: Specifies the date and time of the document's origination.
- Attributes:
- V: The origination date and time value.
- Attributes:
- <confidentialityCode>: Provides information about the confidentiality code of the
document.
- Attributes:
- code: The code value.
- displayName: The display name of the confidentiality.
- codeSystem: The code system value.
- codeSystemName: The name of the confidentiality code system.
- Attributes:
- <patient_encounter>: Contains information about the patient encounter.
- <encounter_tmr>: Represents the encounter date and time.
- Attributes:
- visit: Indicates whether it is a visit (true/false).
- V: The encounter date and time value.
- Attributes:
- <encounter_tmr>: Represents the encounter date and time.
- <legal_authenticator>: Represents the legal authenticator associated with the
document.
- <signature_cd>: Specifies the signature code.
- Attributes:
- V: The signature code value.
- <participation_tmr>: Indicates the participation date and time.
-
- Attributes:
- V: The participation date and time value.
-
- <id>: Represents the ID of the legal authenticator.
- Attributes:
- EX: The ID value.
- RT: The ID value (Coding System).
- <person>: Contains information about the person associated with the legal
authenticator.
- <person_name>: Represents the name of the person.
- <nm>: Contains the name components.
- <GIV>: Represents the given name.
- Attributes:
- V: The given name value.
- <MID>: Represents the middle name.
- Attributes:
- V: The middle name value.
- <FAM>: Represents the family name.
- Attributes:
- V: The family name value.
- <SFX>: Represents the name suffix.
- Attributes:
- V: The suffix value.
- <person_name.type_cd>: Specifies the type of the person’s
name.
- Attributes:
- V: The type of code value.
- S: The ID value(Coding System).
- <nm>: Contains the name components.
- <person_name>: Represents the name of the person.
- <signature_cd>: Specifies the signature code.
- <patient>: Contains details about the patient.
- <patient.type_cd>: Specifies the patient type code.
- Attributes:
- V: The patient type code value.
- <person>: Represents the person information of the patient.
- <id>: Represents the ID of the person.
- Attributes:
- EX: The ID value.
- RT: The ID value(Coding System).
- Attributes:
- <id>: Represents the ID of the person.
- <person>:
- <person_name>:
- <nm>:
- <GIV>:
- Attributes:
- V: The given name value.
- <FAM>:
- Attributes:
- V: The family name value.
- <SFX>:
- Attributes:
- V: The suffix value.
- <person_name.type_cd>:
- Attributes:
- V: The type of code value.
- S: The ID Value(Coding System).
- Attributes:
- <addr>: Represents the address information of the patient.
- <STR>: Represents the street address.
- Attributes:
- V: The street address value.
- <CTY>: Represents the city.
- Attributes:
- V: The city value.
- <STA>: Represents the state.
- Attributes:
- V: The state value.
- <ZIP>: Represents the ZIP code.
- Attributes:
- V: The ZIP code value.
- <telecom>: Represents the contact information of the patient.
- Attributes:
- V: The contact value.
- USE: The usage of the contact.
- <birth_dttm>: Specifies the birth date and time of the patient.
- Attributes:
- V: The birth date and time value.
- <pcp_name>: Represents the name of the primary care provider associated with the
patient.
- Attributes:
- V: The name value.
- <referring_name>: Represents the name of the referring provider associated with
the patient.
- Attributes:
- V: The name value.
- <administrative_gender_cd>: Indicates the administrative gender code of the
patient.
- Attributes:
- V: The gender value.
- S: The ID value(Coding System).
Body [1005 ~ Lab Flowsheet]:
Lab Flowsheet:
1. <section> element: Initial Labs
- The <caption> element represents the caption or title of the section, which is “Initial Labs”.
- There could be 1 table “<table>” HTML tag within the section.
- Within the <table> HTML tag, there are rows that represented as a <tr>. The Header represents under <th> html tag and content/values represents under <td> html tags.
- <th>: Each tag represents column headers.
- Lab Name : Specifies the lab name.
- Date Received : Specifies the date received.
- Result : Specifies the result.
- Reviewed : Specifies the reviewed by.
- Note : Specifies the Note.
- <td>: Each tag represents the content/value for the above details.
2. <section> element: Optional Labs
- The <caption> element represents the caption or title of the section, which is “Optional Labs”.
- There could be 1 table “<table>” HTML tag within the section.
- Within the <table> HTML tag, there are rows that represented as a <tr>. The Header represents under <th> html tag and content/values represents under <td> html tags.
- <th>: Each tag represents column headers.
- Lab Name : Specifies the lab name.
- Date Received : Specifies the date received.
- Result : Specifies the result.
- Reviewed : Specifies the reviewed by.
- Note : Specifies the Note.
- <td>: Each tag represents the content/value for the above details.
3. <section> element: 8-18 Week labs
- The <caption> element represents the caption or title of the section, which is “8-18 Week labs”.
- There could be 1 table “<table>” HTML tag within the section.
- Within the <table> HTML tag, there are rows that represented as a <tr>. The Header represents under <th> html tag and content/values represents under <td> html tags.
- <th>: Each tag represents column headers.
- Lab Name : Specifies the lab name.
- Date Received : Specifies the date received.
- Result : Specifies the result.
- Reviewed : Specifies the reviewed by.
- Note : Specifies the Note.
- <td>: Each tag represents the content/value for the above details.
4. <section> element: 24-28 Week labs
- The <caption> element represents the caption or title of the section, which is “24-28 Week labs”.
- There could be 1 table “<table>” HTML tag within the section.
- Within the <table> HTML tag, there are rows that represented as a <tr>. The Header represents under <th> html tag and content/values represents under <td> html tags.
- <th>: Each tag represents column headers.
- Lab Name : Specifies the lab name.
- Date Received : Specifies the date received.
- Result : Specifies the result.
- Reviewed : Specifies the reviewed by.
- Note : Specifies the Note.
- <td>: Each tag represents the content/value for the above details.
5. <section> element: 32-36 Week labs
- The <caption> element represents the caption or title of the section, which is “32-36 Week labs”.
- There could be 1 table “<table>” HTML tag within the section.
- Within the <table> HTML tag, there are rows that represented as a <tr>. The Header represents under <th> html tag and content/values represents under <td> html tags.
- <th>: Each tag represents column headers.
- Lab Name : Specifies the lab name.
- Date Received : Specifies the date received.
- Result : Specifies the result.
- Reviewed : Specifies the reviewed by.
- Note : Specifies the Note.
- <td>: Each tag represents the content/value for the above details.
Sticky Notes
The below document is in xml format, the issue of XML data being in an unreadable format and then proceed
with the steps to convert it into SVG for improved visualization.

Converting Flowsheet XML Data into SVG for Improved Visualization
Introduction
When working with graphical data represented in XML-like JSON format, it can sometimes be challenging to interpret and visualize the content. One effective way to enhance readability and understandability is by converting this JSON data into SVG (Scalable Vector Graphics) format. SVG is a widely used markup language for describing two-dimensional vector graphics, making it suitable for visual representation of shapes, patterns, and drawings.
Prerequisites
Before proceeding, ensure you have:
- A basic understanding of JSON (JavaScript Object Notation).
- Familiarity with SVG syntax and structure.
Steps to Convert XML-like JSON Data to SVG
Follow these steps to convert XML-like JSON data into SVG format:
1. Prepare JSON Data
Start with the XML-like JSON data that you wish to convert. This data typically includes attributes and values like XML elements.
2. Create an SVG File
Open a plain text editor of your choice and create a new file. Give the file a .svg extension to indicate that it's an SVG document.
3. Add SVG Header
Add the SVG header to your file. This header specifies the SVG namespace and version, as well as the dimensions of the SVG canvas:
<svg xmlns="http://www.w3.org/2000/svg" version="1.1" width="100" height="100">
Replace width and height with appropriate values according to your design.
4. Translate JSON Data to SVG Path Element
Identify the JSON path data that defines the shape or pattern you want to visualize. This JSON path data will typically contain attributes such as "fill," "stroke," "stroke-width," and a "path" attribute containing path commands.
Translate the JSON attributes to their corresponding SVG attributes within a <path> element:
<path
fill="none"
stroke="#000000"
stroke-opacity="1"
stroke-width="1.0"
stroke-linecap="round"
stroke-linejoin="round"
fill-opacity="1"
d="M26,48L26,48L26,48L25,48L25,48L25,48L24,48L24,48L24,48L23,48L23,48L23,48L20,48L20,48L20,48L16,48L16,48L16,48L14,49L14,49L14,49L11,50L11,50L11,50L10,50L10,50L10,50L8,50L8,50L8,50L7,51L7,51L7,51L6,51L6,51L6,51"
/>
5. Close SVG Tag
Complete the SVG file by adding the closing </svg> tag:
6. Save and Visualize
Save the file with the .svg extension (e.g., "output.svg"). You can then open this SVG file in a web browser or a vector graphics editor to visualize the shape or pattern described by the JSON path data.
Sticky Note(SVG)

<svg width="20000" height="2000000" xmlns="http://www.w3.org/2000/svg">
- The <svg> element defines the start of the SVG graphic.
- The width attribute sets the width of the SVG canvas to 20000 pixels.
- The height attribute sets the height of the SVG canvas to 2000000 pixels.
- The xmlns attribute sets the XML namespace for SVG.
<path d="M26,48L26,48L26,48L25,48L25,48L25,48L24,48L24,48L24,48L23,48L23,48L23,48L20,48L20,48L20,48L16,48L16,48L16,48L14,49L14,49L14,49L11,50L11,50L11,50L10,50L10,50L10,50L8,50L8,50L8,50L7,51L7,51L7,51L6,51L6,51L6,51"
fill="none" stroke="blue" stroke-width="2"/>
- The <path> element is used to define shapes and paths in SVG graphics.
- The d attribute contains a series of commands that form the path of the shape. The provided commands appear to create a complex pattern of connected line segments.
- The fill attribute is set to "none," indicating that the shape will not be filled.
- The stroke attribute sets the outline color of the shape to blue.
- The stroke-width attribute sets the width of the outline to 2 units.
<text x="50" y="50" font-family="Arial" font-size="16" fill="black">this is the sample test</text>
</svg>
- The <text> element serves the purpose of displaying text within the SVG graphic.
- The x attribute specifies the x-coordinate of the text's starting point on the canvas. In this case, it's set to 50.
- The y attribute defines the y-coordinate of the text's starting point on the canvas. Here, it's also set to 50.
- The font-family attribute determines the font used for the text, set to Arial.
- The font-size attribute establishes the font size, set to 16 units.
- The fill attribute designates the color of the text, set to black.
Prenatal Flowsheet (1005) Documentation:
Header
- <clinical_document_header>: The root element representing the clinical document header.
- <id>: Represents the ID of the document.
- Attributes:
- EX: The ID value (DocumentID_SequenceNumber, External Identifier).
- RT: The ID value (Coding System).
- <set_id>: Specifies the set ID of the document.
- Attributes:
- EX: The set ID value (DocumentID, External Identifier)
- RT: The ID value (Coding System).
- <version_nbr>: Indicates the version number of the document.
- Attributes:
- V: The version number.
- <document_type_cd>: Describes the type of the document.
- Attributes:
- gmtid: The GMT ID(DocTypeID).
- V: The value of the document type code (LoincCode).
- S: The ID value (Coding System).
- DN: The display name of the document type (Document TypeName).
- Attributes:
- <organization>: Represents the organization associated with the document.
- Attributes:
- NM: The name of the organization.
- <origination_dttm>: Specifies the date and time of the document's origination.
- Attributes:
- V: The origination date and time value.
- Attributes:
- <confidentialityCode>: Provides information about the confidentiality code of the
document.
- Attributes:
- code: The code value.
- displayName: The display name of the confidentiality.
- codeSystem: The code system value.
- codeSystemName: The name of the confidentiality code system.
- Attributes:
- <patient_encounter>: Contains information about the patient encounter.
- <encounter_tmr>: Represents the encounter date and time.
- Attributes:
- visit: Indicates whether it is a visit (true/false).
- V: The encounter date and time value.
- Attributes:
- <encounter_tmr>: Represents the encounter date and time.
- <legal_authenticator>: Represents the legal authenticator associated with the
document.
- <signature_cd>: Specifies the signature code.
- Attributes:
- V: The signature code value.
- <participation_tmr>: Indicates the participation date and time.
- Attributes:
- V: The participation date and time value.
- <id>: Represents the ID of the legal authenticator.
- Attributes:
- EX: The ID value.
- RT: The ID value (Coding System).
- <person>: Contains information about the person associated with the legal
authenticator.
- <person_name>: Represents the name of the person.
- <nm>: Contains the name components.
- <GIV>: Represents the given name.
- Attributes:
- V: The given name value.
- <MID>: Represents the middle name.
- Attributes:
- V: The middle name value.
- <FAM>: Represents the family name.
- Attributes:
- V: The family name value.
- <SFX>: Represents the name suffix.
- Attributes:
- V: The suffix value.
- <person_name.type_cd>: Specifies the type of the person’s
name.
- Attributes:
- V: The type of code value.
- S: The ID value(Coding System).
- <nm>: Contains the name components.
- <person_name>: Represents the name of the person.
- <signature_cd>: Specifies the signature code.
- <patient>: Contains details about the patient.
- <patient.type_cd>: Specifies the patient type code.
- Attributes:
- V: The patient type code value.
- <person>: Represents the person information of the patient.
- <id>: Represents the ID of the person.
- Attributes:
- EX: The ID value.
- RT: The ID value(Coding System).
- <person>: Represents the person information of the patient.
- <person>:
- <person_name>:
- <nm>:
- <GIV>:
- Attributes:
- V: The given name value.
- <FAM>:
- Attributes:
- V: The family name value.
- <SFX>:
- Attributes:
- V: The suffix value.
- <person_name.type_cd>:
- Attributes:
- V: The type of code value.
- S: The ID Value(Coding System).
- <addr>: Represents the address information of the patient.
- <STR>: Represents the street address.
- Attributes:
- V: The street address value.
- <CTY>: Represents the city.
- Attributes:
- V: The city value.
- <STA>: Represents the state.
- Attributes:
- V: The state value.
- <ZIP>: Represents the ZIP code.
- Attributes:
- V: The ZIP code value.
- <telecom>: Represents the contact information of the patient.
- Attributes:
- V: The contact value.
- USE: The usage of the contact.
- <birth_dttm>: Specifies the birth date and time of the patient.
- Attributes:
- V: The birth date and time value.
- <pcp_name>: Represents the name of the primary care provider associated with the
patient.
- Attributes:
- V: The name value.
- <referring_name>: Represents the name of the referring provider associated with
the patient.
- Attributes:
- V: The name value.
- <administrative_gender_cd>: Indicates the administrative gender code of the
patient.
- Attributes:
- V: The gender value.
- S: The ID value(Coding System).
Body [1005 ~ Prenatal Flowsheet]
- <Section> element:
- The <caption> element represents the caption or title of the section, which is “Encounter History”.
- There could be 1 table “<table>” HTML tag within the section.
- Within the <table> HTML tag, there are rows that represented as a <tr>. The Header represents under <th> html tag and content/values represents under <td> html tags.
- <th>: Each tag represents column headers.
- Encounter Date Time Provider (Provider Id) [Modified By]: Specifies the Encounter Date Time, Provider name, Provider Id and Modified Username.
- Gest. : Specifies the Gestation header.
- Fundal Ht. : Specifies the Fundal Height header.
- Pres. : Specifies the Presentation.
- FHR : Specifies the Fetal Heart Rate.
- Fetal Mov.: Specifies the Fetal Movement.
- Contractions : Specifies the Contractions.
- Cervix Exam : Specifies the Cervix Exam.
- B.P. : Specifies the Blood Pressure.
- Edema : Specifies the Edema.
- Wt. : Specifies the Weight.
- Urine Glu./Protein : Specifies the Urine Glucose and Protein.
- <td>: Each tag represents the content/value for the above details.
- Next Appt: Specifies the Next Appointment date.
- Note: Specifies the Notes.
Allergy Tests (1005) Documentation
Below are the few steps involved during the extraction and conversion process.
- The raw data which are stored in binary format in the database are exported as xml files with base64 content for both ‘single patient’ and ‘patient population’
Single patient:
Holds all the tables data in PS related to the patient and their information (Data and Document).
Population patient:
Holds the files/document data in binary format related to the patient (only Document).
- The below illustration is the XML output that is generated for binType [1005: Allergy Tests] by the
‘Export Converter’ tool.
Reference section holds the sample files (input, output).
Header [1005 ~ Allergy Tests]:
- <clinical_document_header>: The root element representing the clinical document header.
- <id>: Represents the ID of the document.
- Attributes:
- EX: The ID value (DocumentID_SequenceNumber, External Identifier).
- RT: The ID value (Coding System).
- <set_id>: Specifies the set ID of the document.
- Attributes:
- EX: The set ID value (DocumentID, External Identifier)
- RT: The ID value (Coding System).
- <version_nbr>: Indicates the version number of the document.
- Attributes:
- V: The version number.
- <document_type_cd>: Describes the type of the document.
- Attributes:
- gmtid: The GMT ID(DocTypeID).
- V: The value of the document type code (LoincCode).
- S: The ID value (Coding System).
- DN: The display name of the document type (Document TypeName).
- <organization>: Represents the organization associated with the document.
- Attributes:
- NM: The name of the organization.
- <origination_dttm>: Specifies the date and time of the document's origination.
- Attributes:
- V: The origination date and time value.
- <confidentialityCode>: Provides information about the confidentiality code of the
document.
- Attributes:
- code: The code value.
- displayName: The display name of the confidentiality.
- codeSystem: The code system value.
- codeSystemName: The name of the confidentiality code system.
- <patient_encounter>: Contains information about the patient encounter.
- <encounter_tmr>: Represents the encounter date and time.
- Attributes:
- visit: Indicates whether it is a visit (true/false).
- V: The encounter date and time value.
- <encounter_tmr>: Represents the encounter date and time.
- <legal_authenticator>: Represents the legal authenticator associated with the
document.
- <signature_cd>: Specifies the signature code.
- Attributes:
- V: The signature code value.
- <participation_tmr>: Indicates the participation date and time.
- Attributes:
- V: The participation date and time value.
- <id>: Represents the ID of the legal authenticator.
- Attributes:
- EX: The ID value.
- RT: The ID value (Coding System).
- <person>: Contains information about the person associated with the legal
authenticator.
- <person_name>: Represents the name of the person.
- <nm>: Contains the name components.
- <GIV>: Represents the given name.
- Attributes:
- V: The given name value.
- <MID>: Represents the middle name.
- Attributes:
- V: The middle name value.
- <FAM>: Represents the family name.
- Attributes:
- V: The family name value.
- <SFX>: Represents the name suffix.
- Attributes:
- V: The suffix value.
- <person_name.type_cd>: Specifies the type of the person’s
name.
- Attributes:
- V: The type of code value.
- S: The ID value(Coding System).
- <nm>: Contains the name components.
- <person_name>: Represents the name of the person.
- <signature_cd>: Specifies the signature code.
- <patient>: Contains details about the patient.
- <patient.type_cd>: Specifies the patient type code.
- Attributes:
- V: The patient type code value.
- <person>: Represents the person information of the patient.
- <id>: Represents the ID of the person.
- Attributes:
- EX: The ID value.
- RT: The ID value(Coding System).
- <id>: Represents the ID of the person.
- <patient.type_cd>: Specifies the patient type code.
- <person>:
- <person_name>:
- <nm>:
- <GIV>:
- Attributes:
- V: The given name value.
- <FAM>:
- Attributes:
- V: The family name value.
- <SFX>:
- Attributes:
- V: The suffix value.
- <person_name.type_cd>:
- Attributes:
- V: The type of code value.
- S: The ID Value(Coding System).
- <addr>: Represents the address information of the patient.
- <STR>: Represents the street address.
- Attributes:
- V: The street address value.
- <CTY>: Represents the city.
- Attributes:
- V: The city value.
- <STA>: Represents the state.
- Attributes:
- V: The state value.
- <ZIP>: Represents the ZIP code.
- Attributes:
- V: The ZIP code value.
- <telecom>: Represents the contact information of the patient.
- Attributes:
- V: The contact value.
- USE: The usage of the contact.
- <birth_dttm>: Specifies the birth date and time of the patient.
- Attributes:
- V: The birth date and time value.
- <pcp_name>: Represents the name of the primary care provider associated with the
patient.
- Attributes:
- V: The name value.
- <referring_name>: Represents the name of the referring provider associated with
the patient.
- Attributes:
- V: The name value.
- <administrative_gender_cd>: Indicates the administrative gender code of the
patient.
- Attributes:
- V: The gender value.
- S: The ID value(Coding System).
Body [1005 ~ Allergy Tests]:
- <section> element for Allergy Tests:
- The <caption> element represents the caption or title of the section, which is "Allergy Tests".
- There could be 1 or more <local_markup> elements within the section.
- Within the <local_markup> element, there is an XML structure represented as a string. The XML structure includes:<datahtml> : The provided format appears to be an HTML code snippet. It seems to be a structured representation of some content, possibly for displaying information on a web page or within an HTML email.The content appears to be organized using various HTML elements such as <div>, <table>, <tr>, <td>, <ul>, and <li>.
- <section> element for Assessment:
- The <caption> element represents the caption or title of the section, which is "Assessment".
- <list> element contains one or more <item> element for different diagnosis.
- <item> : Represents the separate line item added for diagnosis.
- <content> : Data for diagnosis code & description added under this.
- <dxdesc>: Diagnosis description.
- <dxcode>: Diagnosis code (Combination of ICD9 & ICD10. Ex : ICD9/ICD10).
- <coded_entry>: Contains the diagnosis code value.
- Attributes :
- V : Diagnosis code value.
- <content> : Blank line item which adds a new line with <br/> tag.
- <item> : Represents the separate line item added for diagnosis.
- <section> element for Plan:
- The <caption> element represents the caption or title of the section, which is
"Plan".
- Attributes :
- V : Document code.
- S : Document coding system.
- There could be 1 or more <section> elements within the section for Orders, Medications, Instructions, Associate Tasks & Referrals.
- <section> element for Orders:
- The <caption> element represents the caption or title of the section, which is "Orders".
- <list> element contains one or more <item> element for different
procedures.
- <item> : Represents the separate line item added for procedures.
- <content> : Data for procedure name, procedure code, added date &
information about holding lab result until reviewed (Yes/No).
- <coded_entry>: Contains the procedure code value.
- Attributes :
- V : Procedure code value.
- <notes>: Contains the note added by user.
- <section> element for Medications:
- The <caption> element represents the caption or title of the section, which is "Medications".
- <list> element contains one or more <item> element for different
medications.
- <item> : Represents the separate line item added for medication.
- <content> : Data for drug name along with it’s strength
- SIG : Instructions for the dosage of drug.
- DISP : Quantity along with refill number.
- <table> : Added for additional information
- <tr> : 1 or more element added for additional info.
- <td> : Contains the date when drug was prescribed.
- <section> element for Instructions:
- The <caption> element represents the caption or title of the section, which is "Instructions".
- <list> element contains one or more <item> element for different
instructions.
- <item> : Represents the separate line item added for instruction.
- <content> : Data for instruction added for patient in context with medication.
- <item> : Represents the separate line item added for instruction.
- <section> element for Associate Tasks:
- The <caption> element represents the caption or title of the section, which is "Associate Tasks".
- <list> element contains one or more <item> element for different Tasks.
- <item> : Represents the separate line item added for task.
- <content> : Data for task ID & task type along with comments added by user.
- <item> : Represents the separate line item added for task.
- <section> element for Referrals:
- The <caption> element represents the caption or title of the section, which is "Referrals".
- <list> element contains one or more <item> element for referrals.
- <item> : Represents the separate line item added for task.
- <content> : one or more element containing the data for referral ID, added date, type (Inbound/outbound), Specialty information, reason (comments) and other information as well in context with referral.
- <item> : Represents the separate line item added for task.
Allergy Education (1005) Documentation
Below are the few steps involved during the extraction and conversion process.
- The raw data which are stored in binary format in the database are exported as xml files with base64 content for both ‘single patient’ and ‘patient population’
Single patient:
Holds all the tables data in PS related to the patient and their information (Data and Document).
Population patient:
Holds the files/document data in binary format related to the patient (only Document).
- The below illustration is the XML output that is generated for binType [1005: Allergy Education] by the
‘Export Converter’ tool.
Reference section holds the sample files (input, output).
Header [1005 ~ Allergy Education]:
- <clinical_document_header>: The root element representing the clinical document header.
- <id>: Represents the ID of the document.
- Attributes:
- EX: The ID value (DocumentID_SequenceNumber, External Identifier).
- RT: The ID value (Coding System).
- <set_id>: Specifies the set ID of the document.
- Attributes:
- EX: The set ID value (DocumentID, External Identifier)
- RT: The ID value (Coding System).
- <version_nbr>: Indicates the version number of the document.
- Attributes:
- V: The version number.
- <document_type_cd>: Describes the type of the document.
- Attributes:
- gmtid: The GMT ID(DocTypeID).
- V: The value of the document type code (LoincCode).
- S: The ID value (Coding System).
- DN: The display name of the document type (Document TypeName).
- <organization>: Represents the organization associated with the document.
- Attributes:
- NM: The name of the organization.
- <origination_dttm>: Specifies the date and time of the document's origination.
- Attributes:
- V: The origination date and time value.
- <confidentialityCode>: Provides information about the confidentiality code of the
document.
- Attributes:
- code: The code value.
- displayName: The display name of the confidentiality.
- codeSystem: The code system value.
- codeSystemName: The name of the confidentiality code system.
- <patient_encounter>: Contains information about the patient encounter.
- <encounter_tmr>: Represents the encounter date and time.
- Attributes:
- visit: Indicates whether it is a visit (true/false).
- V: The encounter date and time value.
- <encounter_tmr>: Represents the encounter date and time.
- <legal_authenticator>: Represents the legal authenticator associated with the
document.
- <signature_cd>: Specifies the signature code.
- Attributes:
- V: The signature code value.
- <participation_tmr>: Indicates the participation date and time.
- Attributes:
- V: The participation date and time value.
- <id>: Represents the ID of the legal authenticator.
- Attributes:
- EX: The ID value.
- RT: The ID value (Coding System).
- <person>: Contains information about the person associated with the legal
authenticator.
- <person_name>: Represents the name of the person.
- <nm>: Contains the name components.
- <GIV>: Represents the given name.
- Attributes:
- V: The given name value.
- <MID>: Represents the middle name.
- Attributes:
- V: The middle name value.
- <FAM>: Represents the family name.
- Attributes:
- V: The family name value.
- <SFX>: Represents the name suffix.
- Attributes:
- V: The suffix value.
- <person_name.type_cd>: Specifies the type of the person’s
name.
- Attributes:
- V: The type of code value.
- S: The ID value(Coding System).
- <nm>: Contains the name components.
- <person_name>: Represents the name of the person.
- <signature_cd>: Specifies the signature code.
- <patient>: Contains details about the patient.
- <patient.type_cd>: Specifies the patient type code.
- Attributes:
- V: The patient type code value.
- <person>: Represents the person information of the patient.
- <id>: Represents the ID of the person.
- Attributes:
- EX: The ID value.
- RT: The ID value(Coding System).
- <id>: Represents the ID of the person.
- <patient.type_cd>: Specifies the patient type code.
- <person>:
- <person_name>:
- <nm>:
- <GIV>:
- Attributes:
- V: The given name value.
- <FAM>:
- Attributes:
- V: The family name value.
- <SFX>:
- Attributes:
- V: The suffix value.
- <person_name.type_cd>:
- Attributes:
- V: The type of code value.
- S: The ID Value(Coding System).
- <addr>: Represents the address information of the patient.
- <STR>: Represents the street address.
- Attributes:
- V: The street address value.
- <CTY>: Represents the city.
- Attributes:
- V: The city value.
- <STA>: Represents the state.
- Attributes:
- V: The state value.
- <ZIP>: Represents the ZIP code.
- Attributes:
- V: The ZIP code value.
- <telecom>: Represents the contact information of the patient.
- Attributes:
- V: The contact value.
- USE: The usage of the contact.
- <birth_dttm>: Specifies the birth date and time of the patient.
- Attributes:
- V: The birth date and time value.
- <pcp_name>: Represents the name of the primary care provider associated with the
patient.
- Attributes:
- V: The name value.
- <referring_name>: Represents the name of the referring provider associated with
the patient.
- Attributes:
- V: The name value.
- <administrative_gender_cd>: Indicates the administrative gender code of the
patient.
- Attributes:
- V: The gender value.
- S: The ID value(Coding System).
Body [1005 ~ Allergy Education]:
- <section> element:
- The <caption> element represents the caption or title of the section, which is "Allergy Education".
- There could be 1 or more <local_markup> elements within the section.
- Within the <local_markup> element, there is an XML structure
represented as a string. The XML structure includes:
- <datahtml> : The provided format appears to be an HTML code snippet. It seems to be a structured representation of some content, possibly for displaying information on a web page or within an HTML email.The content appears to be organized using various HTML elements such as <div>, <table>, <tr>, <td>, <ul>, and <li>.
- Within the <local_markup> element, there is an XML structure
represented as a string. The XML structure includes:
- <section> element for Assessment:
- The <caption> element represents the caption or title of the section, which is "Assessment".
- <list> element contains one or more <item> element for different
diagnosis.
- <item> : Represents the separate line item added for diagnosis.
- <content> : Data for diagnosis code & description added under
this.
- <dxdesc>: Diagnosis description.
- <dxcode>: Diagnosis code (Combination of ICD9 & ICD10. Ex : ICD9/ICD10).
- <coded_entry>: Contains the diagnosis code value.
- Attributes :
- V : Diagnosis code value.
- <content> : Blank line item which adds a new line with <br/> tag.
- <section> element for Plan:
- The <caption> element represents the caption or title of the section,
which is "Plan".
- Attributes :
- V : Document code.
- S : Document coding system.
- There could be 1 or more <section> elements within the section for Orders, Medications, Instructions, Associate Tasks & Referrals.
- The <caption> element represents the caption or title of the section,
which is "Plan".
- <section> element for Orders:
- The <caption> element represents the caption or title of the section, which is "Orders".
- <list> element contains one or more <item> element for different
procedures.
- <item> : Represents the separate line item added for procedures.
- <content> : Data for procedure name, procedure code, added date
& information about holding lab result until reviewed (Yes/No).
- <coded_entry>: Contains the procedure code value.
- Attributes :
- V : Procedure code value.
- <notes>: Contains the note added by user.
- <coded_entry>: Contains the procedure code value.
- <section> element for Medications:
- The <caption> element represents the caption or title of the section, which is "Medications".
- <list> element contains one or more <item> element for different medications.
- <item> : Represents the separate line item added for medication.
- <content> : Data for drug name along with it’s strength
- SIG : Instructions for the dosage of drug.
- DISP : Quantity along with refill number.
- <table> : Added for additional information
- <tr> : 1 or more element added for additional info.
- <td> : Contains the date when drug was prescribed.
- <section> element for Instructions:
- The <caption> element represents the caption or title of the section, which is "Instructions".
- <list> element contains one or more <item> element for different
instructions.
- <item> : Represents the separate line item added for instruction.
- <content> : Data for instruction added for patient in context with medication.
- <section> element for Associate Tasks:
- The <caption> element represents the caption or title of the section, which is "Associate Tasks".
- <list> element contains one or more <item> element for different
Tasks.
- <item> : Represents the separate line item added for task.
- <content> : Data for task ID & task type along with comments added by user.
- <item> : Represents the separate line item added for task.
- <section> element for Referrals:
- The <caption> element represents the caption or title of the section, which is "Referrals".
- <list> element contains one or more <item> element for referrals.
- <item> : Represents the separate line item added for task.
- <content> : one or more element containing the data for referral ID, added date, type (Inbound/outbound), Specialty information, reason (comments) and other information as well in context with referral.
- <item> : Represents the separate line item added for task.